Simple Automatic Image Backup Protocol for Photographers

How to backup your photos to prevent loss of your precious photos

Over the years I have seen so many photographers post in forums and on social media, looking for help on how to retrieve their valuable images from their failed hard drives, that it still STUNS me that they are NOT using a simple and automated backup system that ensures their images are safe.

Bikini Calendar Photography - Behind the Scenes
Bikini Calendar Photography – Behind the Scenes

For those of you that think that automatic backup of your images is unnecessary, then you obviously do not understand that every single hard drive WILL FAIL. That’s right, 100% of all hard drives and SSD’s will fail. HDD’s and SSD’ all have a finite life, some shorter than others, and unless you are a clairvoyant, they will fail before you can take action.

ALL Hard Drives WILL Fail

So you have NO OPTION but to employ a redundant backup system.

At our photography studio, we have been backing up our images automatically since 2002, and we have never lost a single image so I thought I would show you a simple backup protocol that has never let us down.

Danny Steyn Photography Studios - Natural Light Studio
Danny Steyn Photography Studios – Natural Light Studio

Please note that since we shoot several Terabytes of images for our studio each year, and since cloud storage services are priced based on the size of storage needed, and since uploading large quantities of huge image files uses significant bandwidth, we currently do NOT use cloud storage for our image backup. As prices for both storage and bandwidth continue to drop, this is something that we might consider in the future

But before we start, here are a few terms that you need to understand

  • NAS – network attached storage
  • RAID – random array of independent drives
  • NAS Enterprise Drive – a more durable hard drive certified for NAS enclosures
  • SYNCTOY – simple Free Microsoft Backup utility that creates the backups
  • Scheduled Task – something that happens automatically at a given time

So this is our Simple Photo Backup Protocol

All of our data, photographic images, and video are stored on NAS’s.

Danny Steyn Image Storage NAS devices - 3 Versions
Danny Steyn Image Storage NAS devices – 3 Versions

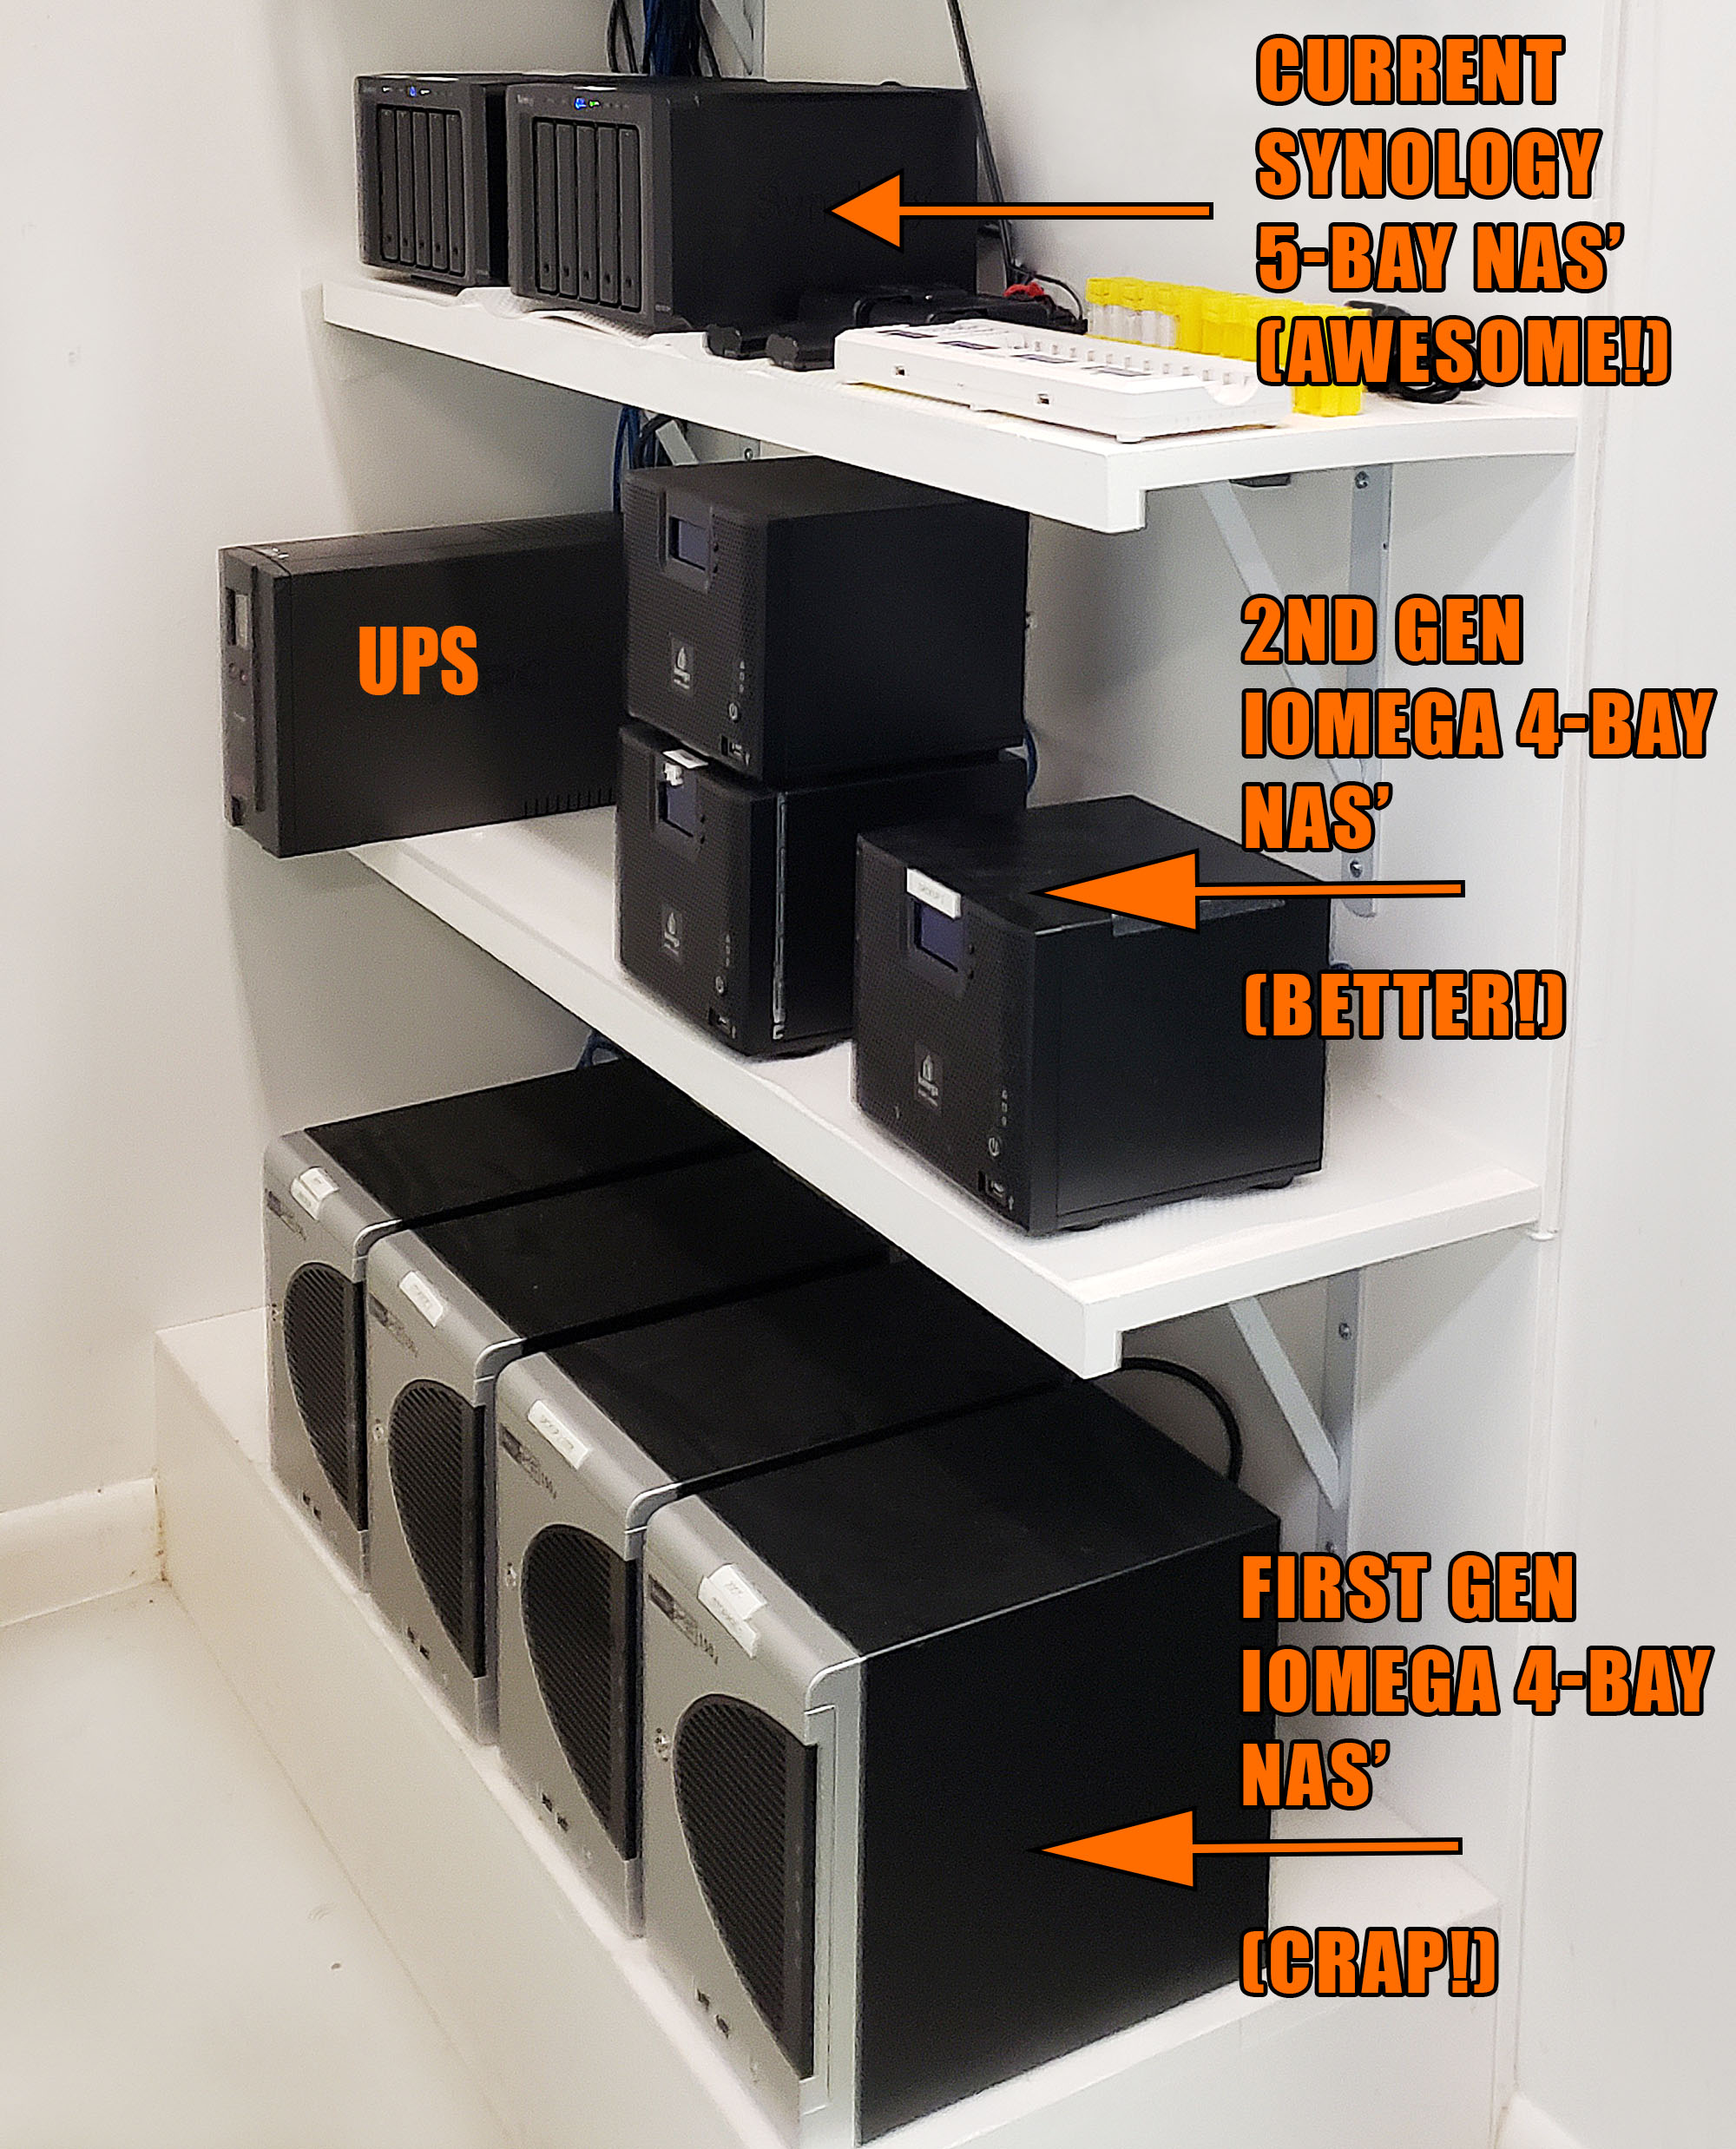
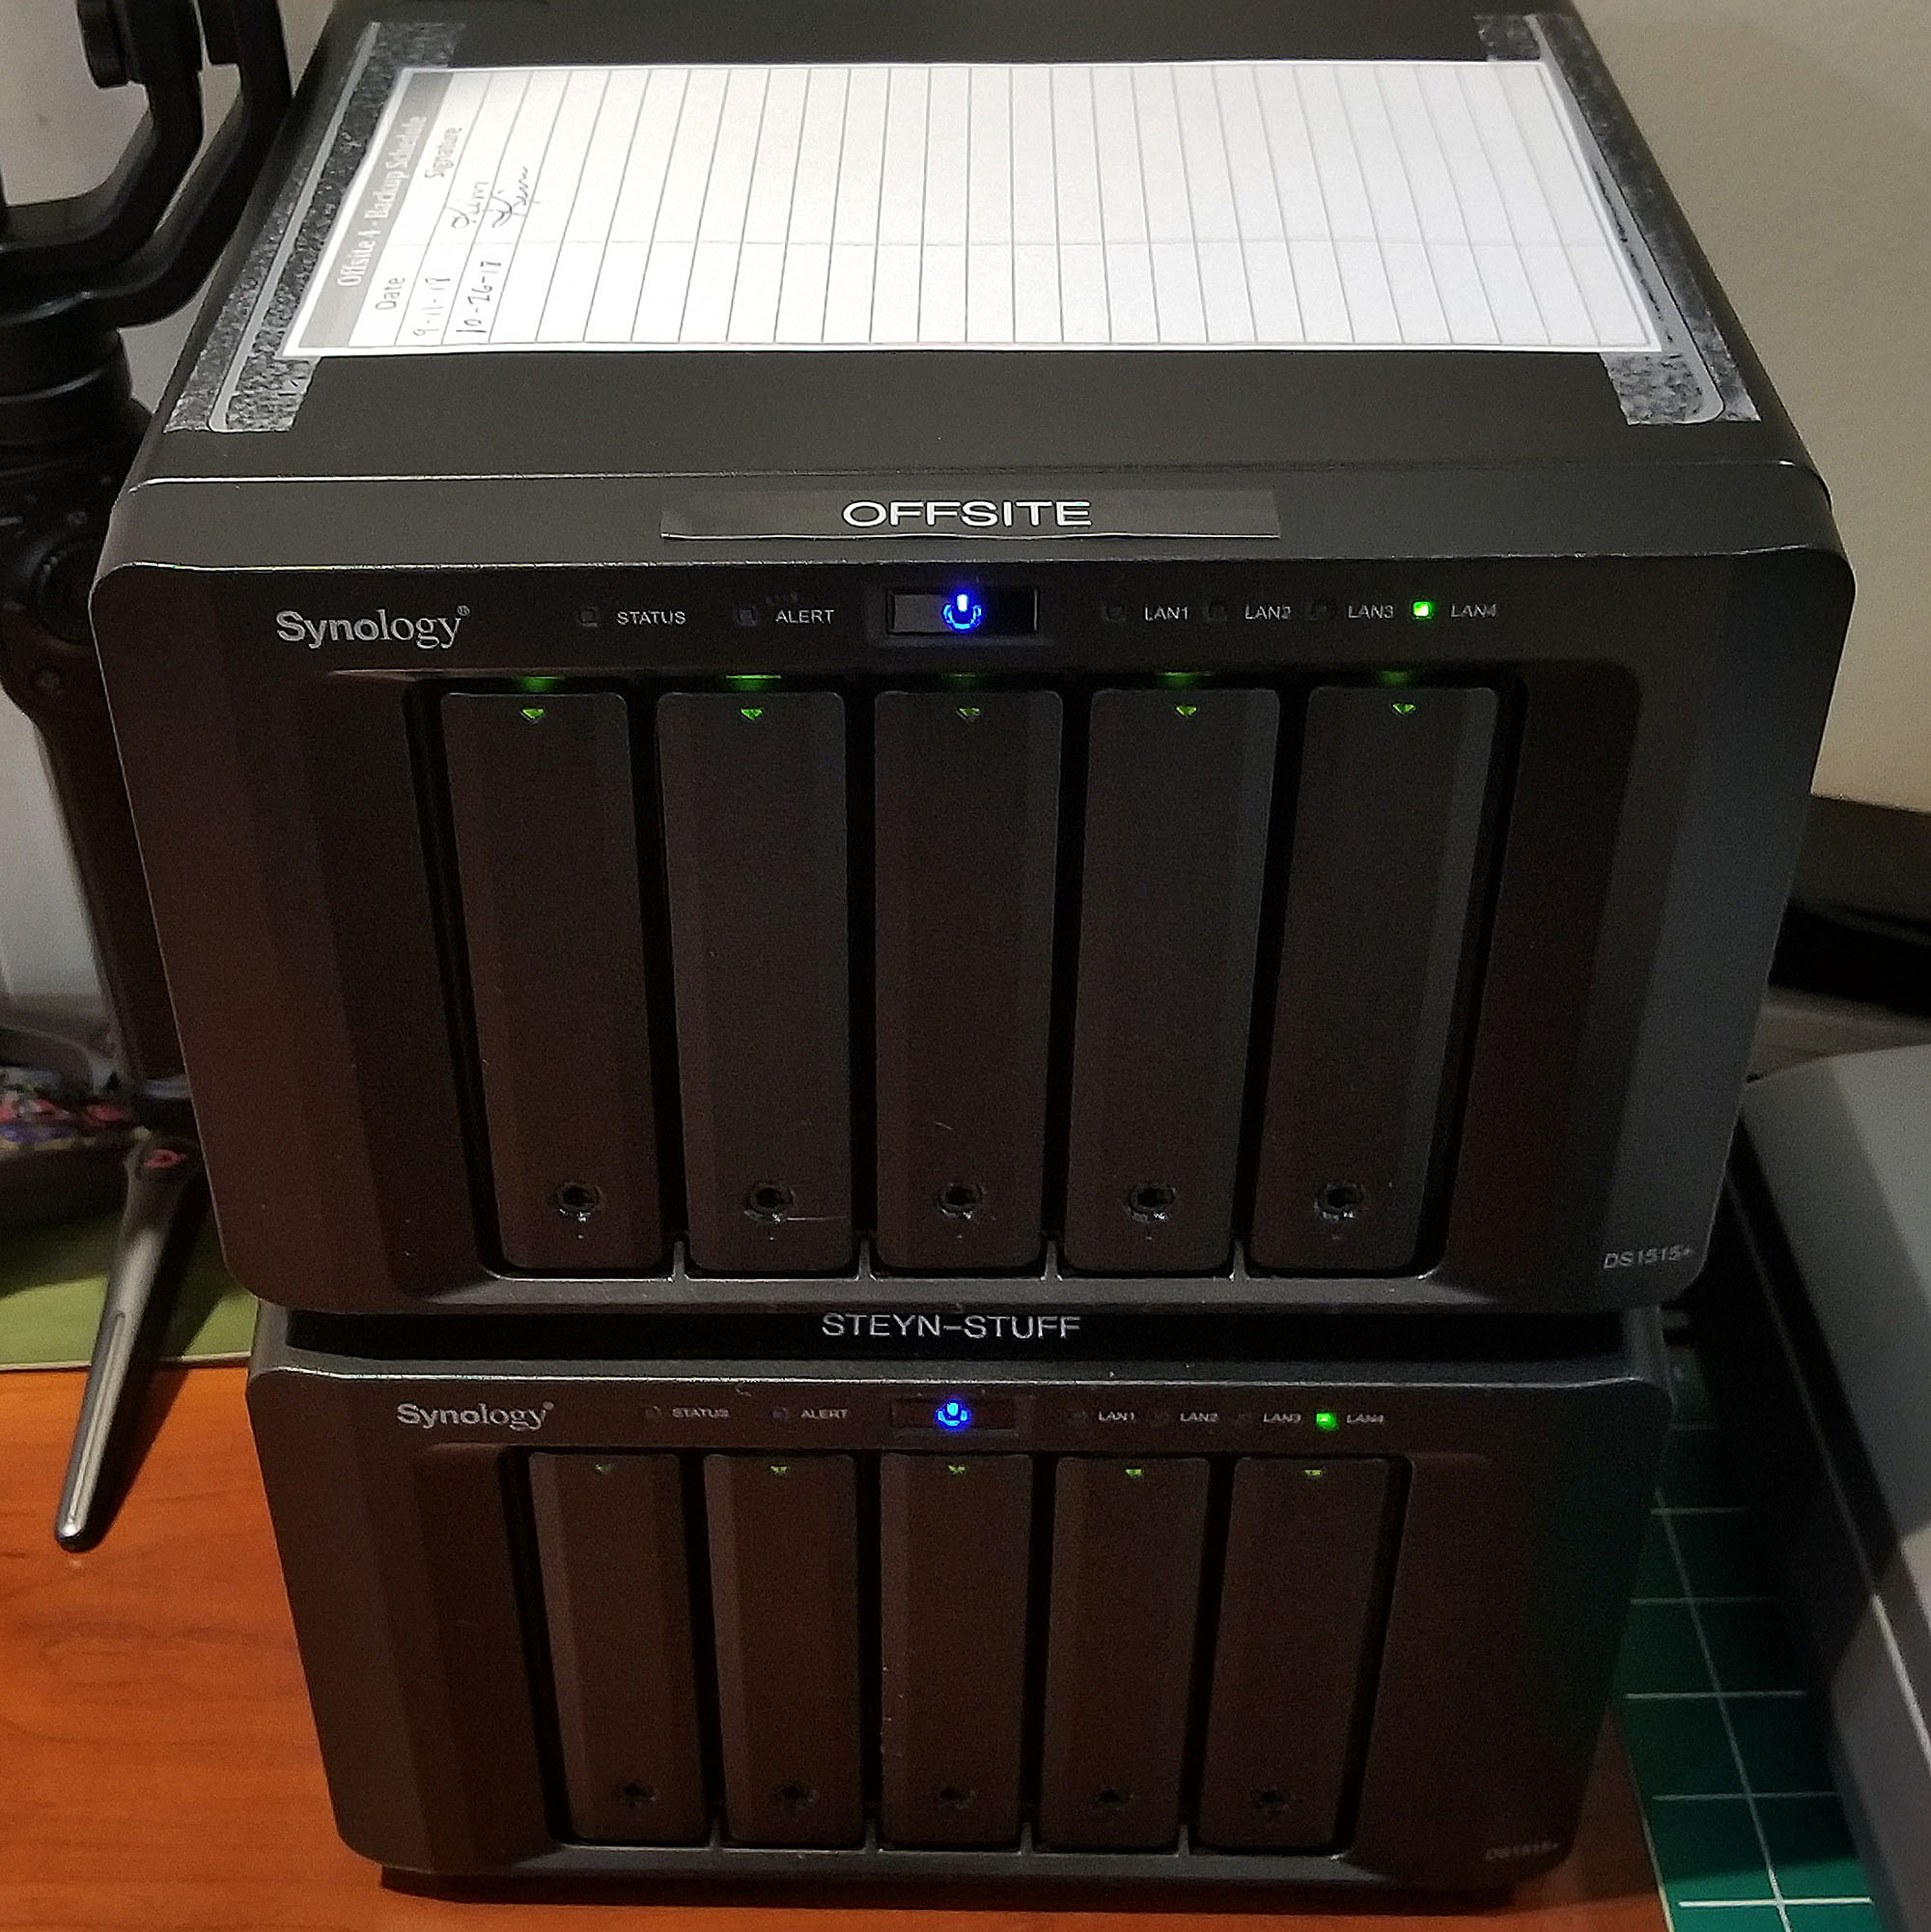
We use three NAS devices. Our primary NAS storage device is called “STORAGE”.

As you can see from the image above, we have tried many different brands and models of NAS devices, but we have now standardized on the Synology DS15+ and more recent Synology DS17+. These are 5 bay NAS enclosures and they can take any size of hard drive, but they all need to be the same size.

Synology DS1515+ 5-Bay drives with 5 x 8TB NAS Enterprise HDD's Striped in RAID 5
Synology DS1515+ 5-Bay drives with 5 x 8TB NAS Enterprise HDD’s Striped in RAID 5

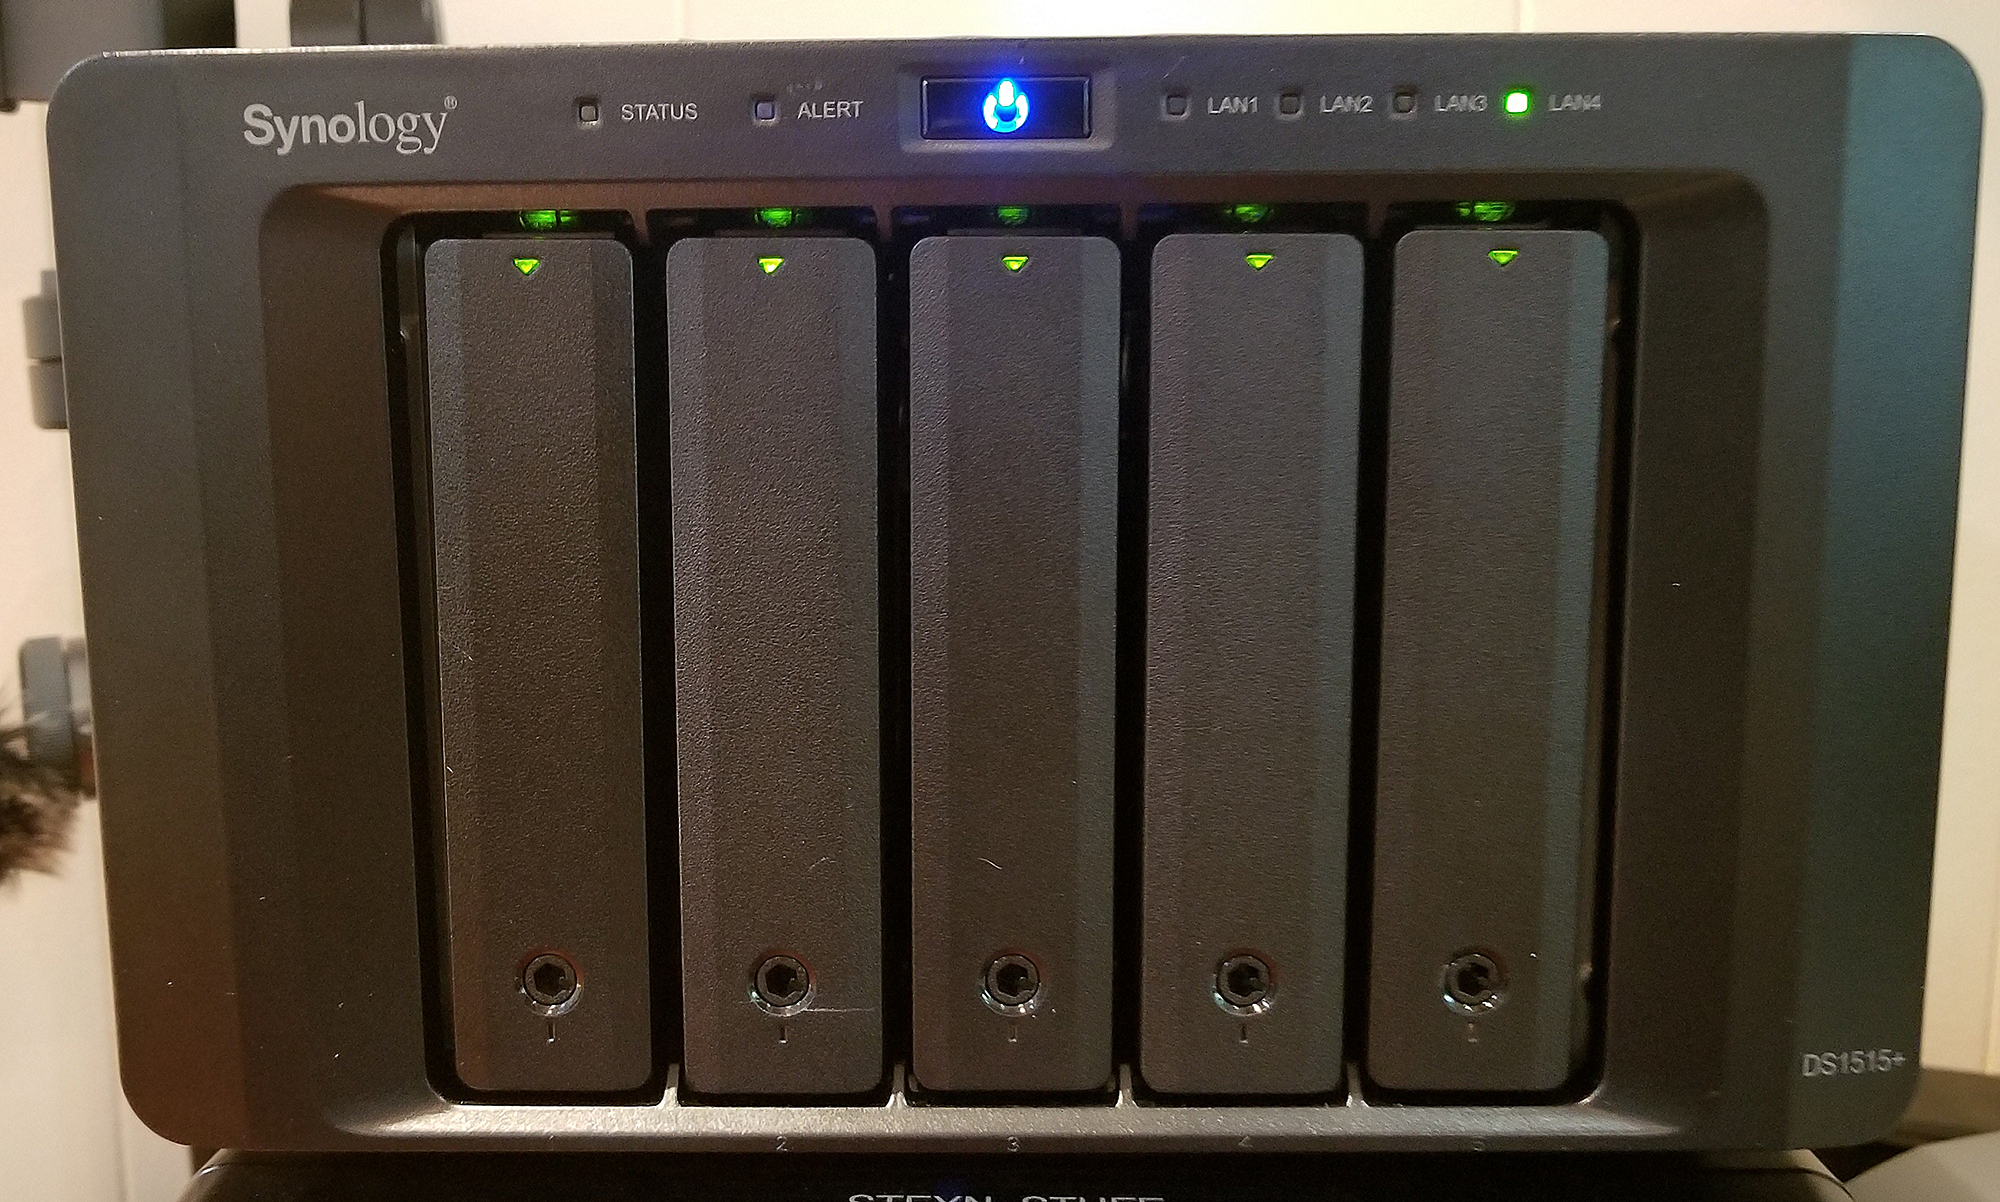
We currently populate the bays with 8TB WD Enterprise NAS Hard drives, and then in the Synology Control Manager, we stripe them in a RAID 5 configuration (a very simple procedure).

Note that hard drives certified for NAS usage are significantly more durable than the standard consumer hard drives and most of them have last us several years of continuous usage. Remember that ALL hard drives will fail over time. You should read this paper discussing Enterprise vs Consumer drives

Striping the NAS in RAID 5 means that even though we have 5 x 8TB drives with 40TB of overall storage, we only end up with around 30TB of usable storage as part of the drives are used as the parity portion of the RAID. This means that when one drive fails you do NOT LOSE ANY DATA, you simple pull out the failed drive and replace it with a new identical drive and the RAID will automatically rebuild the RAID and all data will be saved and accessible.

So now you understand what our primary STORAGE NAS looks like.

Now we have two more identical Synology NAS’s, all populated with the same 5 x 8TB NAS hard drives and also striped in RAID 5.

These additional NAS’s are called “BACKUP” and “OFFSITE

The STORAGE and BACKUP NAS’s live at our studio. Our OFFSITE NAS lives at our home.  If you keep all your images in one place, you are still totally exposed and vulnerable to a break in and theft or a total loss due to a fire / flood. By having an entire backup offsite at another location, you are ensuring that you are not exposed to this vulnerability.

Avoid Catastrophic Loss due to Fire

For our automatic backup, we use the free Microsoft  SYNCTOY software that comes with Windows. This is a powerful backup utility that can easily be configured in many ways. It is way easier to use than its predecessor ROBOCOPY.

Microsoft SyncToy Backup Utility

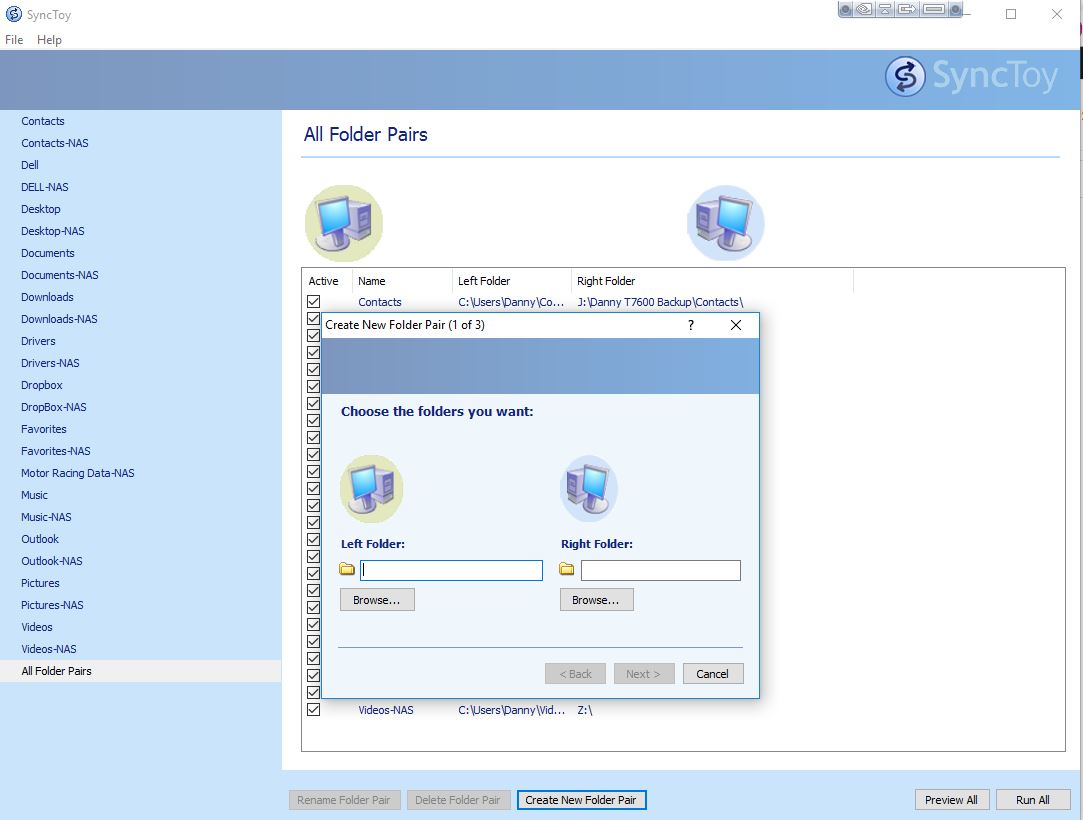
We set up SYNCTOY to write one-way only. That is we only write from STORAGE to BACKUP, never the other way. It examines the data on our STORAGE drive and compares it to what is on our BACKUP drive and if there are images on our STORAGE drive that are not on our BACKUP drive, it copies from STORAGE to BACKUP. That way we are only adding images to BACKUP.  We are never syncing both ways.

In the Windows Task Scheduler we set SyncToy to run every evening at 5pm. We are always at the studio at this time but we typically wrapping up the day. So we are there to confirm the backup is running automatically, but it is not slowing our system down when we are doing the bulk of our editing work.

And then once a week we physically take in our OFFSITE NAS to the studio, backup from STORAGE to  OFFSITE and bring it home the same day.

We also make note, on a form taped to the OFFSITE NAS, of the day that we backed the data, as sometimes you forget when last you backed it up.

Synology-NAS-OFFSITE for offsite backup redundancy

This way if our studio was a total loss in a fire, at the worst case scenario we would potentially only lose the images for the week that we did not back up to the OFFSITE drive.

There are also some tremendous benefits to using the Synology drives. They have so many cool apps, and offer so many functions that I will only discuss a few below.

  • You can set up your NAS to give you access to your entire image library from anywhere in the world so that if you are traveling and you need to access a specific image for a client or magazine, you just log into a secure portal, provided by Synology, that then allows you to access your NAS and you can download, or upload, any image you need.
  • I also use a SYnology NAS at home as my media server for our TV’s and blue tooth speakers, so that every TV in our house can stream the movies and music that I have saved on the NAS.
  • And there are many more useful APPS

As I mentioned before we have learned a lot of things regarding image backup

  • All hard drives fail, even the NAS certified drives and especially consumer hard drives. We have lost close to 30 drives in 16 years but we are spinning about 72 drives across all our NAS’s continuously 24 hours a day
  • When we buy a new Synology NAS enclosure and the 5-drives we need for the NAS, we always buy at least another 2-3 spare identical drives. This is to ensure that when we inevitably have to replace a drive, we have the exact same size and type of drive.
  • NAS devices can also fail, just like PC’s. When we lost NAS’s before Synology, the hard drives still had the data, but the replacement NAS enclosures would not rebuild the data. But we had redundant backups so we were OK. We have only had one Synology NAS fail to date, and when we installed the drives in the NAS, the drives automatically rebuilt and were functioning perfectly within a day.
  • Multiple NAS’s will add additional noise and heat to your environment, so we created our NAS area just outside our offices in the studio to reduce the noise Make sure you have enough A/C as multiple 5-drive enclosures will generate heat. We routed an additional cooling duct from our A/C system to vent directly above the NAS enclosure shelves, and this ensures the cool operation of the NAS’s.
  • And remember, if you do not have your backup scheduled AUTOMATICALLY, you will forget to do it and you will end up losing data. Trust me on this, I have seen this happen with one of my hired photographers that was backing up his personal images manually and he thought he was up to date, and yet he was almost 4 months behind when his drive crashed, losing 4 months’ worth of  own images.

Anyway, this simple set-it-and-forget-it approach has helped us avoid the inevitable drama that comes from losing precious and irreplaceable images, and the potential lawsuits from angry customers.

I hope this helps

Danny Steyn


High Speed Sync – 1/5,000th second at f1.4 in bright sunlight with flash!

I have been trying to perfect High Speed Sync on my Nikon Cameras for over 5 years. For me the ability to shoot in full sunlight at wide open apertures (f2.8 or faster) with strobe illuminating the model, has been the Holy Grail.

High Speed Sync Testing with Jisel
High Speed Sync- 1/2000th second, f1.4, 100 ISO, bright sunlight

Shooting a model outdoors at wide open apertures in full sunlight has always been possible with a reflector, but as any photographer will tell you, you have to factor in the model’s eye sensitivity to the reflected light as often she would have a frown cross her brow as she tried to deal with the bright light reflected into her face, even if you had her close her eyes and only open them for a milli-second. And of course trying to get the right rhythm and flow with a model opening a closing her eyes on command leaves a lot to be desired.

Shooting Glamour outdoors in bright sunlight using a reflector for fill light

But the problem with all DSLR camera’s is their maximum flash sync speed is limited to around 1/250th of a second, which means that if you are shooting outdoors in bright sunlight at ISO 100, and 1/250th of a second, you are typically shooting at and aperture of around f5.6 to f8, which increases depth of field, and diminishes attractive bokeh highlights. Models then merge into the background unless you are using very long focal length lenses. Shooting with flash at shutterspeed above the camera’s synch speed yields the dreaded black band across the image.

I first became aware of High Speed Sync, or rather Hyper Sync, with sports photographers freezing skiers, skateboarders and motocrossers in midflight, illuminated by flash, and so I set about my journey to figure it all out.

Hyper Sync relied on timing the maximum burst of a larger studio strobe to coincide with the shutter slit opening, and this provided more illuminating power than High Speed Sync (HSS) which relied on the strobe firing thousands of consecutive low power flashes to provide essentially continuous light.

With a lot of trial and error I was able to develop a workflow using Pocket Wizards transmitters triggering either Nikon Speedlights or Alienbees Monolights. However the consistency of results was never repeatable.

Hypersync testing with Nikon D3X, single Alien Bees 640WS monolight at full power, ISO 100 F2.8 and varying the shutter speed. Testing to see how shutterspeed affects the flash exposure outdoors

With Hyper Sync I would get stunning, clean un-banded exposures at 1/2000th of a second using my approach, but if you click on the image above and view full size you will see the dreaded banding start to make its presence felt at shutter speeds over 1/2,000ths of a second.  But at 1/2,000th of a second it would yield stunning shots, just like in the image of Emily below, but the consistency of exposure was not perfect.

Hypersync testing with Emilee in bright sunlight - 1/2,000th second, f2.8, 100 ISO, Nikon D3x Alien Bees, Pocket Wizard
Hypersync testing with Emilee in bright sunlight – 1/2,000th second, f2.8, 100 ISO, Nikon D3x Alien Bees, Pocket Wizard

Even keeping, ISO, shutterspeed and aperture constant, and with NO  changes to power levels or light-to-model distance, consecutive images could have more than a stop of exposure variance and I could never trust Hyper Sync for my commercial client shoots, so it was relegated to my personal work and experimentation, which I love.

You can read about my early trials with HyperSync and HSS here .

A few years ago I bought Profoto B1’s, B2’s, D1’s, and more recently D2’s. Even with the built in High Speed Sync (HSS) capability, image to image exposure variances were not consistent enough to trust. But with the latest Profoto software update released in January of 2017, things have really improved.

The HSS shots of Jisel in this article were taken around 10 am in FULL bright sunlight hitting the back of the model. There are no shade cloth’s, no scrims keeping the direct sunlight off her. The sunlight is falling on the model’s back. And because the sunlight is hitting her back, and because she has no reflected light shining in her face, her eyes are relaxed, there is no frown, and her pupils are normally dilated.

These images were shot with my Nikon D5 set at 100ISO, using the wonderful new Nikon 105mm F1.4 lens, shooting fully wide open. To get the right ambient light exposure in the background at F1.4, I varied the shutter speed between 1/2,000th and 1/5,000th of a second, and of course without strobe the model is a complete silhouette as you can see in the image below.

High Speed Sync Testing with Jisel
High Speed Sync- 1/2000th second, f1.4, 100 ISO, bright sunlight

Then I added two Profoto B1’s equipped with 5ft Octobox’s to provide the fill light and balanced it in manual mode (almost at full power) with the lights mounted less than 8ft from the model (any distance greater than that and the reduced power obtained in High Speed Sync mode will not provide enough illumination). Once I found the satisfactory power and distance-to-model settings, I was able to shoot around 70 images, all with perfect consecutive image to image exposure, with no discernible variation.

One further note:- Since the Profoto flash units will need to be near their maximum power output in manual mode to support HSS, you will burn through batteries very quickly, so make sure you have adequate batteries being charged as you are shooting. Also make sure that the flash capacitors have fully recharged before taking the next shot. I highly recommend setting your Profoto lights to give the audible ready-beep, because when shooting in bright light, your in-camera flash-ready light might not be adequately visible.

I hope you enjoy the images, as well as the new frontier in glamour photography that this ushers in.

High Speed Sync Testing with Jisel
High Speed Sync- 1/2000th second, f1.4, 100 ISO, bright sunlight
High Speed Sync Testing with Jisel
High Speed Sync- 1/5000th second, f1.4, 100 ISO, bright sunlight
High Speed Sync Testing with Jisel
High Speed Sync- 1/5000th second, f1.4, 100 ISO, bright sunlight

Wirelessly Previewing Images on Tablets – CamRanger vs. Nikon WT-6A

TETHERED PREVIEWING IN THE STUDIO USING CAPTURE ONE

In our studio we shoot what I consider the current traditional way, tethered by USB 3 cable to a Microsoft Surface Pro running Windows 10 and Capture ONE software, displaying the preview image on a 60” monitor. This scenario is perfect for static shooting that takes place in a studio, and makes a wonderful training tool for our photographic workshops, but since you are physically tethered to the laptop via a cable, it is not ideal for location, where you might need to be more mobile.

Previewing images in studio on a 65" monitor. Nikon D5 tethered to a Surface Pro with HDMI output to Monitor.
Previewing images in studio on a 65″ monitor. Nikon D5 tethered to a Surface Pro with HDMI output to Monitor.
Previewing images in studio on a 65" monitor. Nikon D5 tethered to a Surface Pro with HDMI output to Monitor.
Previewing images in studio on a 65″ monitor. Nikon D5 tethered to a Surface Pro with HDMI output to Monitor.
Shooting tethered to a 60 inch monitor is a superb tool when conducting photographic workshops. Nikon D5 tethered to 60" monitor using Surface Pro running Capture One software
Shooting tethered to a 60 inch monitor is a superb tool when conducting photographic workshops. Nikon D5 tethered to 60″ monitor using Surface Pro running Capture One software
Shooting with Nikon D5 with wireless transmitter WT-6A transmitting to iPad tablet running Nikon Software, supported on a mini light stand and a K&M iPad Mount

LOCATION SHOOTING – WIRELESSLY PREVIEWING ON TABLETS

For the past 4 years, on location, I have shot with the Nikon D3x wirelessly “tethered” to various tablets via a CamRanger. The flexibility and freedom to effortlessly move around a location while wirelessly tethered to a tablet is the main reason, plus the ability to show the model or client large size images during the shoot is a significant advantage.

Previewing of Images on Tablets using Wireless Transmitters. Nikon D3X with CamRanger Wireless Transmitter

Having recently moved to the Nikon D5’s and the WT-6A transmitters, we are still shooting wirelessly direct to various mobile devices, and currently viewing images in the Chrome Browser.

Previewing of Images on Tablets using Wireless Transmitters. Nikin D5 with Nikon WT-6A
Previewing of Images on Tablets using Wireless Transmitters. Nikon D5 with Nikon WT-6A

There are several pros and cons of each setup and I thought I would share my experiences with the photographic community, and of course would like to hear of other’s experience and approach

Previewing of Images on Tablets using Wireless Transmitters. Nikin D5 with Nikon WT-6A vs Nikon D3x with CamRanger
Previewing of Images on Tablets using Wireless Transmitters. Nikon D5 with Nikon WT-6A vs Nikon D3x with CamRanger

CamRanger

PROS

  • Very intuitive. Setup/configurations is simple and fast
  • Fast upload of preview image
  • I love that I can save the images to both the tablet and to the memory card. This provides image redundancy in the event of a corrupted card, and also allows us to continue to view the images, even when the camera is switched off during wardrobe / set changes
  • The CamRanger battery lasts an entire 8 hour day of shooting.
  • Inexpensive

CONS

  • Wireless connection to CamRanger drains the camera battery really fast. In a typical 8 hour shoot we will go through at least 4 D3-x camera batteries. I attach a small 3000mAh external USB battery pack with Velcro to allow our tablet to give us a full day of image viewing
  • Cannot pinch-zoom. You can double tap to view the full size image, but you cannot zoom to a specific area (say eyes to check catchlights)
  • You always have to think about the additional pack and USB wire. I hook the CamRanger to my belt / Monopod / tripod, but you have to remember to unhook when you put your camera down.
  • The CamRanger software isn’t as stable as it could be.

Overall I highly recommend CamRanger for simple inexpensive wireless tethering.

Here is a couple of shots from some recent shoots including my Playboy Playmate shoot with Nikki DuPlessis shot with my typical CamRanger Setup using a Manfrotto magic arm with the K&M Ipad Mount mounted to the side of my tripod.

Wireless previewing images on iPad tablet using CamRanger attached to Nikon D3x

Nikki Du Plessis - Playboy South Africa

WT-6A (so far only using it direct to HTTP connection, and viewing in a browser)

PROS

  • The adapter is tiny, attached to the camera, and it becomes part of the camera. There are no additional devices or wires that you have to consider, so it is way more convenient. I leave it attached to the camera even when I am not using it
  • Very fast, almost instantaneous upload of preview image (less than 2 seconds)
  • Interestingly, the wireless connection does not drain the camera battery. In a full day of continuous shooting, over 9 hours, we only changed the D5 battery once at around the 6 hour mark
  • Setup/configurations is simple and fast
  • Ability to pinch and zoom the image to a desired magnification is great

CONS

  • Really Expensive for what it is – just a wireless transmitter
  • The Nikon HTTP browser software approach is really clunky – will look into alternative viewing platforms
  • The inability in the browser to swipe left/right to load the previous/next images is SO unintuitive. Right now you have to hit a minute forward arrow key to view the next image. Cannot believe that Nikon would not resolve this ASAP.
Shooting with Nikon D5 with wireless transmitter WT-6A transmitting to iPad tablet running Nikon Software, supported on a mini light stand and a K&M iPad Mount

Behind the Scenes of 2016 Oceanette Calendar Shoot

We had the distinct pleasure of shooting the 2016 Oceanette Calendar once again, this time for the 10th Anniversary of the Calendar.  This calendar has become so popular all over the world and has featured many beautiful girls throughout the years.  This year was especially fantastic as we had one of our original girls, Wendy, from the very first calendar shoot with us again after 10 years!  The photographers, crew and everyone had such a great time and we are all very excited to see the final results and the Behind the Scenes video when it is realeased later this year.

Make Up Artists hard at work, making all the girls look stunning!

calendar photography fort lauderdale calendar-photography-fort-lauderdale-0002 calendar photography fort lauderdale calendar-photography-fort-lauderdale-0004 calendar-photography-fort-lauderdale-0005

Prepping for the cover shot!calendar-photography-fort-lauderdale-0006 calendar-photography-fort-lauderdale-0007 calendar-photography-fort-lauderdale-0008 calendar-photography-fort-lauderdale-0009 calendar-photography-fort-lauderdale-0010 calendar-photography-fort-lauderdale-0011 Shooting some ariel inside with a drone!calendar photography fort lauderdale calendar-photography-fort-lauderdale-0013 calendar-photography-fort-lauderdale-0014

If you have a calendar that you would like shot for your company, give us a call at the studio to inquire at 954-351-8884.


Welcome to our new Photography Studio – Construction is Complete!

Sorry for the long delay in updating our Photography Studio Construction Project thread, but I am happy to report that our studio is finally finished (well as complete as anything can ever be!)

When we moved into our previous studio we had the privilege of getting it complete prior to move in, but with this build project we had to move in and start shooting while we were still involved in the construction, so we have had to balance our construction schedule with our shooting schedule, which fortunately is up significantly on last year.

We have been shooting in our new photography studio for the past 6 months. It is an exquisite studio and it provides us with many benefits over our previous location, but of course owning our own building allows us to modify and tailor it specifically to our needs, and we hope to see some capital appreciation over the years.

Danny Steyn Photography Studios Fort Lauderdale

Kim did a tremendous job with landscaping and improving the exterior look of the studio and we have had many people, including the City, compliment us on the new appearance. The existing signage was easily changed out. We will install signage on the front of the building when the time is right.

Danny Steyn Photography Studios Fort Lauderdale

The Lobby is where we meet with our clients and hopefully it creates the right first impression. It is light, and roomy and provides a comfortable seating area with a large 60 inch TV which runs our photographic images in a slide show. The display is easily customizable depending on the clientele we are servicing that day.

Danny Steyn Photography Studios - Front Lobby
Danny Steyn Photography Studios – Front Lobby


From the LOBBY you enter the GALLERY. We use the GALLERY to showcase our work and to transition from the two shooting studios to the prop room and bathrooms. Currently we just have customer images on the wall while we are busy framing images and hanging lights. Once this area is complete I will update with new images.

Danny Steyn Photography Studios - Gallery
Danny Steyn Photography Studios – Gallery


The EDITING OFFICE is where we spend most of their lives and it has four dual monitor work stations, and place for several more. It is served from our Servers and NAS Storage and Backup Servers located on rack server in the Prop Room.

Danny Steyn Photography Studios - Editing Offices
Danny Steyn Photography Studios – Editing Offices


The PROP ROOM is always the hardest place to keep organized. The more props, lights, softboxes etc. you have, the harder it is to find space to store them other than having them clutter up your shooting space. And we typically shoot till we are too exhausted to pack things away before heading home at night. Fortunately we learned many lessons at our previous studio and made several organizational changes for our new studio. As you can see there is a place for everything and everything is in its place. We employ a custom designed pulley and rail system to get the heavy and bulky props off the floor and onto the shelving space above. This keeps the floor clean and work bench easily accessible for building more props!!!

Danny Steyn Photography Studios - Prop Room
Danny Steyn Photography Studios – Prop Room
Danny Steyn Photography Studios - Prop Room
Danny Steyn Photography Studios – Prop Room


The KITCHEN and MAKEUP STATION area is smaller than we would have liked but we had to make do with the space we had. You will recognize the kitchen cabinets from our previous studio which we were fortunately able to reuse. This space is very organized, and we now have separate 20A electrical outlets through the mirror at each of the 4 MUA stations, allowing 4 models to be styled simultaneously using heavy amp curling tongs, dryers etc. We also upgraded the electrical circuits in the Prop Room where we do all the ironing and steaming of our client’s wardrobe.

Danny Steyn Photography Studios - Makeup Stations and Kitchen
Danny Steyn Photography Studios – Makeup Stations and Kitchen


And finally we come to the twin hearts of our studio – the shooting areas.

The wonderful light that we have in our NATURAL LIGHT STUDIO is a great addition to our studio. This is something that we did not have in the past, and the ability to shape natural light has given us a totally new shooting dimension. We also installed window blinds, roll down backdrops against the far wall as well as a pulley system that provides the ability to easily hang several layers of curtains or props to create depth and interest, which combined with the length of the studio makes it perfect for building our elaborate boudoir photography sets.

Danny Steyn Photography Studios - Natural Light Studio
Danny Steyn Photography Studios – Natural Light Studio
Danny Steyn Photography Studios - Natural Light Studio
Danny Steyn Photography Studios – Natural Light Studio


Our PRODUCT and PORTRAIT STUDIO was the last phase to be completed as it has been serving as our storage area while we have been shooting and working on the other rooms. It features a full size seamless cyclorama wall as well as motorized back-drop rolls and pull out sliding backdrops for fast background changes. And of course it has a drive through roller shutter door that allows vehicles into the studio, either for shooting or for offloading location equipment.

Danny Steyn Photography Studios - Product and Portrait Studio
Danny Steyn Photography Studios – Product and Portrait Studio

Hope this thread gives you ideas on what do in your own shooting spaces.

Hypersync test #7 – Nikon D3x / Alien Bees / Pocket Wizards – Hypersync Testing with Playboy Model Alexandria

You can read my previous hypersync testing results here:- Hypersync Test 1Hypersync Test 2Hypersync Test 3Hypersync Test 4 (Diana), Hypersync Test 5, Hypersync Test 6 (Emilee)

This test with Alexandria was a complete departure from my previous tests which had been conducted to establish that I that I could comfortably shoot at 1/2,000th of a second at 100 ISO and F2.8 in bright outdoor light with my Nikon D3, Alien Bees and Pocket Wizard transceivers. And I had established that I could shoot all the way up to 1/8,000th of a second with minimal cropping to the frame.

With that knowledge I wanted to try something completely different. I have played with freezing liquids in a studio setting using the fast flash duration of speedlights to freeze the liquid, but I wanted to see if I could use fast shutterspeed to freeze the liquid outdoors in bright sun, but overpowering the sun with studio strobes.

Freezing Liquids Outdoors Concept

You may ask, why do I want to freeze water outdoors in a bright setting?

Well, when you freeze liquids in a studio setting you are typically shooting against a dark background (typically black) and backlighting the liquid with the speedlights. There is generally no color in the liquid. For instance, frozen water looks like a lovely mass of molten acrylic, shiny, sparkly and totally clear with the back studio backdrop showing through the liquid. And of course when shooting opaque liquids like milk you end up with a frozen white liquid with droplets.

And the uniformity of color and background makes Photoshop work so simple that creation of composite “liquid dresses” whether they be water or milk, are relatively easy to shoot and composite in various ways.

But if you shoot outdoors in a bright colorful location, the clear water will refract all the colors of the background into the frozen mass, essentially creating a molten multicolored acrylic canvas, as you can see. And with the detail and color contained in the water, you really need to capture the full image in the camera, as it will be a total pain to build up a composite image in Photoshop.

Hypersync, Nikon D3, 1600 ISO, 1/4,000th sec, F8. Bright sunlight, Four Alien Bees 640WS flashes, using Pocket Wizard transceivers

Practice makes perfect

I have tried freezing water outside in bright sun with hypersync several times in the past all with less than perfect results. My main issue is that I always shoot glamour at around F2.8 to F4.0 with long lenses in order to have the sharp model pop off the blurred background. But when you throw water in front of or behind the model, now you need depth of field otherwise the water splashes will be out of focus, essentially destroying the intended effect (as seen in the image below with two water streams separated in by approximately 4 feet).

Hypersync, Nikon D3, 800 ISO, 1/4,000th sec, F5.6. Bright sunlight, Four Alien Bees 640WS flashes, using Pocket Wizard transceivers

So now this means you need to have a smaller aperture to create a larger depth of field to have both the model and the water in focus. Or you can shoot with a short lens, and have the entire scene in focus, something that I almost never do in glamour.

So during this shoot I was totally out of my comfort zone.

Also, shooting at smaller apertures with hypersync adds another wrinkle. When you shoot with hypersync you are not getting the full flash illumination that you would normally get at the standard camera flash sync speeds. You are getting the tail of the flash, very often a small fraction of the rated flash power of the head. And when shooting with hypersync, not only is the aperture affecting the flash illumination, but the shutterspeed now also has a linear relationship with the flash illumination. The faster the shutterspeed the less flash illumination provided.

Hypersync Settings – Nikon D3, 4 x Alien Bees 640WS at full power, Pocket Wizards

So, in trying to freeze water outside with flash, not only do I have to go to a smaller aperture, but I also have to shoot at a shutterspeed of somewhere around 1/4,000th to 1/8,000th of a second, both variables killing the already reduced flash power available. This only leaves ISO, so once again I am forced out of my comfort zone and I am forced with the flash power I have available to shoot at way higher ISO’s than I ever do in my glamour work. For this test I ended up shooting at around 1,000 to 1,600 ISO, and of course deal with the associated noise/grain.

The Shoot

I also had an idea to incorporate an assortment of balloons in the water to add excitement and add more specular highlights so we all spent an age inflating, tying off and weighting down 50 odd balloons, and trying to get them to cooperate. Unfortunately the translucency of the balloons meant that flash power the perfectly exposed the model completely blew out the highlights in the balloons, so that idea never really worked.

The gorgeous Playboy model Alexandria Kingsbury graciously collaborated with me on this project and I was ably assisted by two Art Institute students Brian and Lazaro. I tried all aperture, shutterspeed and ISO combinations, along with a host of lighting approaches, using scrims, modifiers, barn-doors and flags and finally nailed down something that worked. And of course there were hundreds upon hundreds of buckets of water tossed in front, behind and on top of our lovely model, all trying to nail that one defining shot that I had visualized in my mind. Of course, converting the visual idea into a finished product was way more difficult than I had imagined and as far as I am concerned the defining shot never materialized.

Hypersync, Nikon D3, 1250 ISO, 1/5,000th sec, F8. Bright sunlight, Four Alien Bees 640WS flashes, using Pocket Wizard transceivers. Model Alexandria Kingsbury
Hypersync, Nikon D3, 1250 ISO, 1/5,000th sec, F6.3. Bright sunlight, Four Alien Bees 640WS flashes, using Pocket Wizard transceivers. Model Alexandria Kingsbury
Hypersync, Nikon D3, 1250 ISO, 1/6,400th sec, F8. Bright sunlight, Four Alien Bees 640WS flashes, using Pocket Wizard transceivers. Model Alexandria Kingsbury

Once again Hypersync allowed me to do something that would not be possible using HSS or standard flash sync speed, and I am pretty encouraged with the results. However, Hypersync once again proved to be problematic by not being consistent throughout the shoot. This further reinforces me experience that the technology is great for personal work but is not reliable enough for me to use with my commercial clients.