Nikon D3x hypersnyc test with Alien Bees B1600 flash using Pocket Wizard Mini TT1, Flex TT5, AC3 Zone controller and MC9 – TEST #2

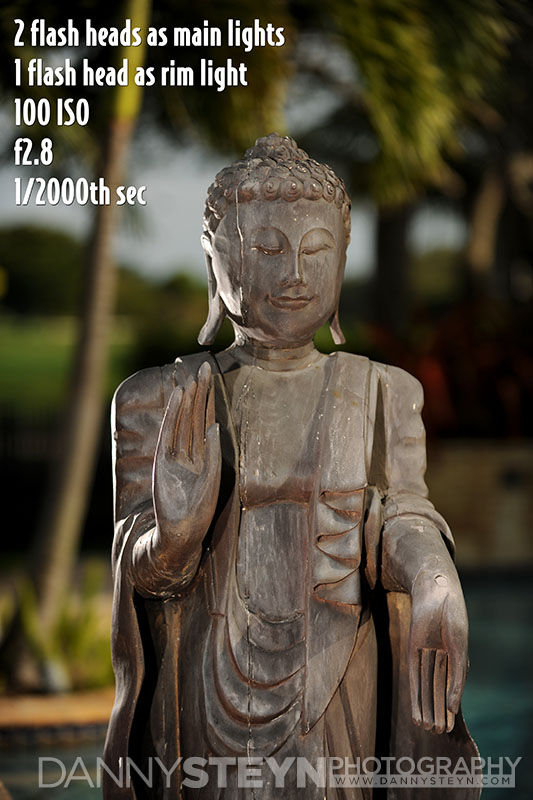
Hypersync with Nikon D3x and Alien Bees B1600 Flash

Pocket Wizard’s hypersync function allows you to use flash at shutter speeds well over the standard maximum synch speed of your camera (in most cases the max flash synch speed is around 1/250th of a second).

Why do you need flash synch at speeds over 1/250th second?

Sure I know I am late to the game, but the ability to sync flash at shutter speeds well above the camera manufacturer’s flash synch speed is a huge advantage for photographers like myself. While researching the various approaches to making this work, I became very aware that most photographers yearn for more information, so in an attempt to help photographers like myself wander through the hypersync / high speed sync morass of conflicting opinion, I offer my own journey of discovery. Hopefully some of this helps.

I typically shoot outdoor glamour and this has been paying the bills for most of my life, but like most photographers I wanted to be able to shoot my models with flash outdoors at any time, including the mid day sun, but at wide apertures to create the shallow depth of field that blurs the background and makes the model pop out of the shot. But the midday sun necessitates shutter speeds way higher than the camera’s flash sync speed, even at low ISO values. So I was confined to using either early morning light with flash or typically shooting with reflectors once the sun got higher.

Outdoor glamour image - natural light and four reflectors - Focal length 190mm, 100 ISO, 1/250th second at f3.2
Outdoor glamour image – natural light and four reflectors – Focal length 190mm, 100 ISO, 1/250th second at f3.2

My typical early morning sunrise beach shots typically required shutter speeds in the range of 1/250th – 1/2,000th of a second at my preferred shooting apertures ranging between F2.8 and F4.0 at 100 ISO.

Prior High Speed Sync HSS Experiences

Several years ago I experimented with my Nikon D3x and the Nikon SB 800 and SB 900 flash heads doing the Nikon HSS high speed synch. And while I was able to get some decent exposures all the way up to 1/8,000th of a second, for the most part it was a very unsatisfactory approach for my work from many viewpoints.

  • Irrespective whether I was using the Nikon SU 800 as the commander unit or the SB 900 flash as the commander, the infra red signal would not transmit the signal consistently in bright sunlight
  • The rapid strobing in HSS robbed the units of so much power that I had to gang four SB900 flash heads together to blast through a small soft box to illuminate the model evenly and to create a somewhat larger catch light in the eyes than the tiny pin pricks that a speed light delivers.
  • So the ganged flash combo had to be placed very close to the model, sometimes interfering with the shot, and would sometimes provide the uneven illumination that comes from having the light source to close to the subject.
  • And the flash heads would over heat under any type of rapid shooting that occurs when you get in the zone.

Since the SU 800 and SB 900 infra-red signals were not reliable, I tried out the Radio Popper transceivers that convert the infra red signal to radio signal. The flash signals were transmitted way more reliably than with the SU 800 SB900 combo on its own, but the other issues above remained.

I eventually gave up on High Speed Sync for any commercial shooting but still played with it for my personal work as I love to experiment and try new things

So last year I started playing with the pocket Wizard Mini TT1 and Flex TT5 for Nikon. I wanted to see if the HSS mode was any better. The Pocket Wizard radio signal was totally reliable, the flashes fired 100% of the time even over long distances in the midday sun but sadly the power issue of the speed lights was no different and the heads had to be placed way too close to the model to make them usable.

Hypersync.

So I put the gear away in frustration and went back to what worked for me in the past. But after a few months I felt that I should give it another try, and this time I was going to focus on Hypersync and not High Speed Sync. For those of you who are not sure of the difference between High Speed Sync and Hypersync, I suggest reading up on this as the two approaches are very different.

Hypersync technology is achieved using the Pocket Wizard radio transmitters and receivers, PLUS software to create a pre-trigger event that allows most of the illumination from a particular flash head to synchronize with the higher than normal shutter speed on a particular camera. Please note that this very dependent on the equipment used. The brand and model of flash will have an effect, as will the brand and model of camera used. You must experiment with your equipment to see what works best for you.

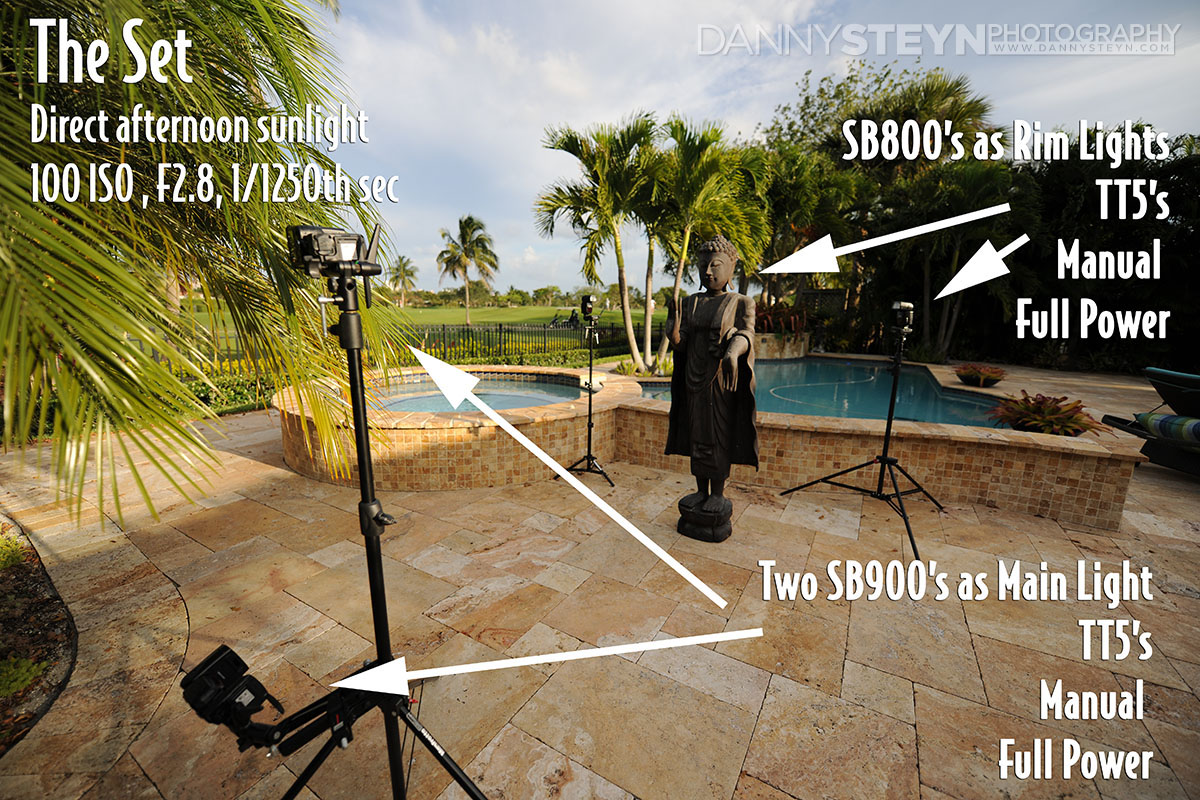
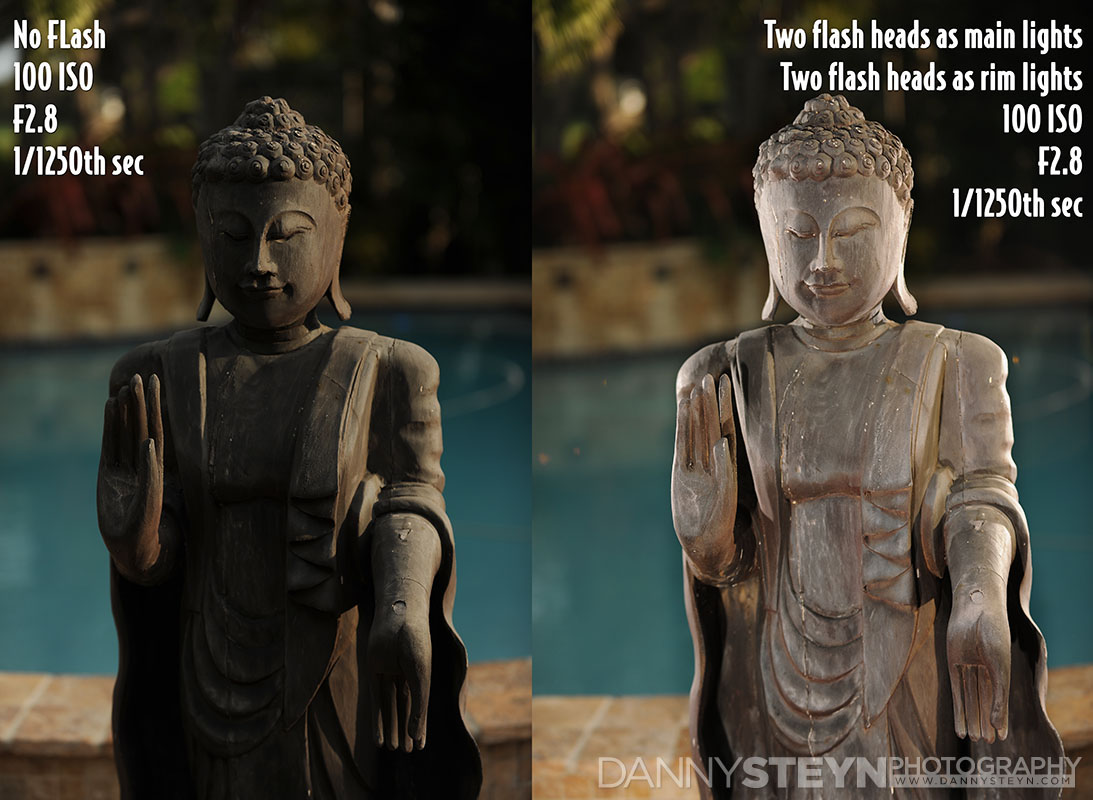
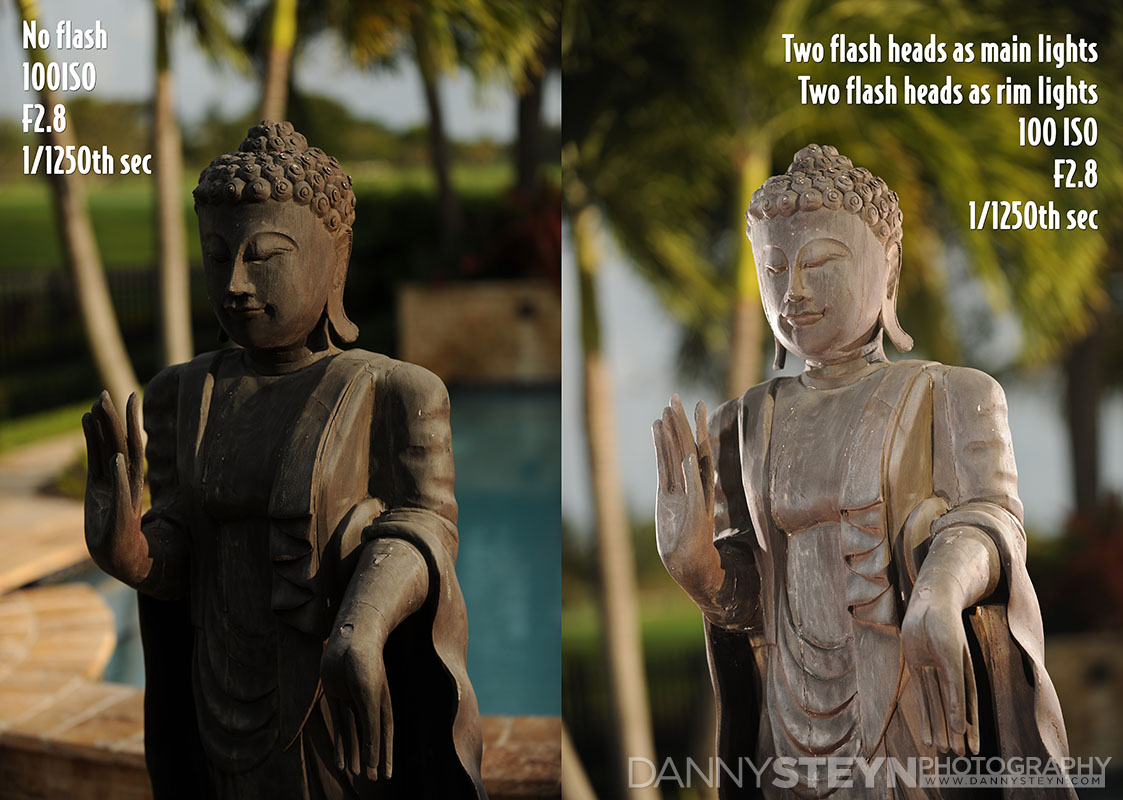
Hypersync Nikon D3X with Nikon Speedlights

You can read all about my very promising first foray into Hypersync using my Nikon D3x camera, Pocket Wizard TT1 transmitters, Pocket Wizard TT5 transceivers, and my Nikon SB 900’s and SB 800 speedlights.

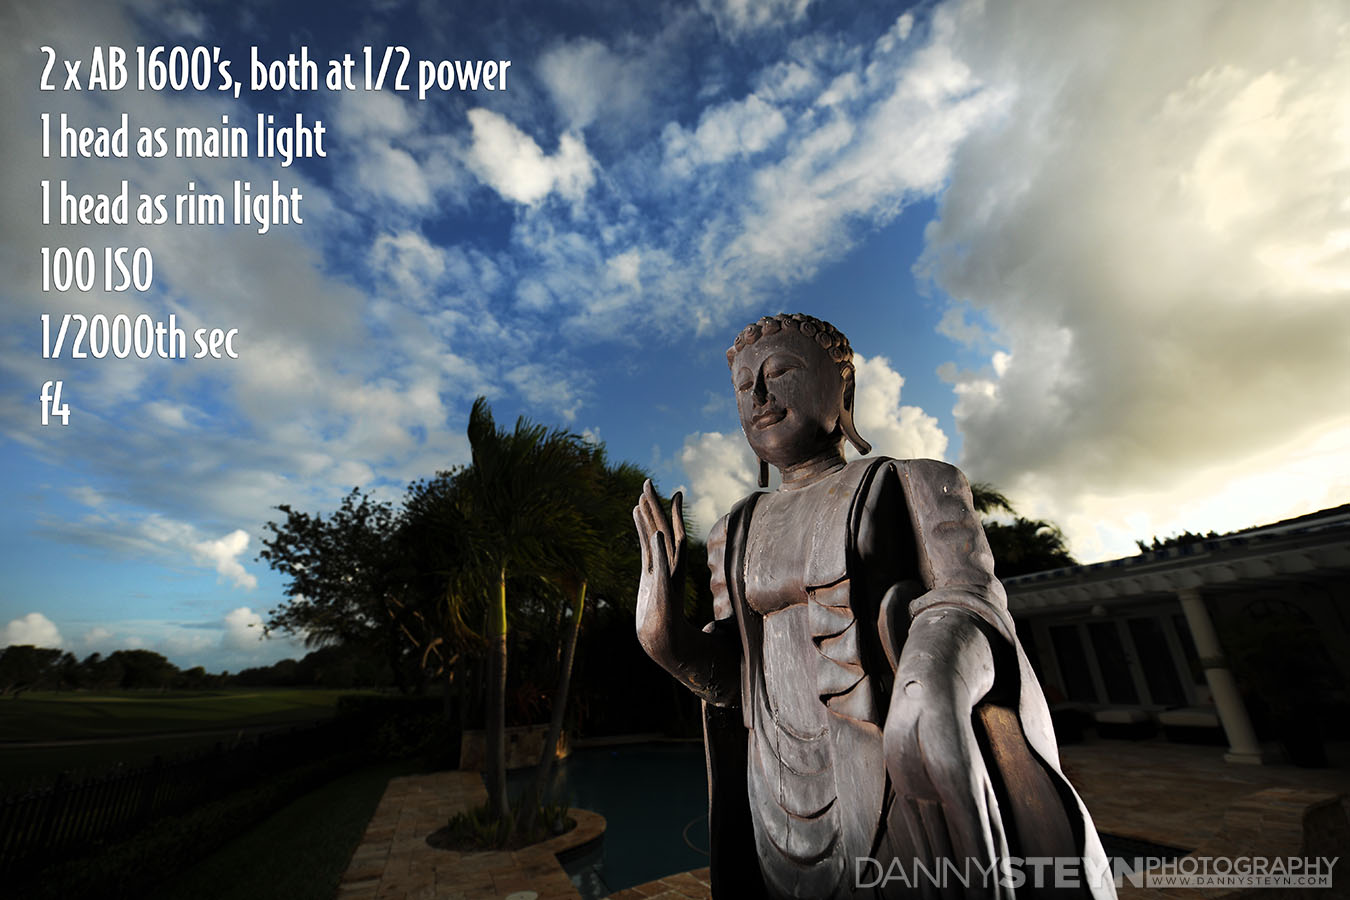
Hypersync Nikon D3X with Alien Bees B1600 Monolights

While the Hypersync yielded way better performance and reliability with the Nikon SB 800 and SB 900 Speedlights than with HSS, the lack of power was still the main issue. So I started experimenting with our traveling mono lights, the Alien Bees B1600’s that provide 640WS at full power. Paul C Buff has built a superb reputation with these lights by providing arguably the best customer service in the industry as well as exceptional value, and these lights have been our go-to location lights for years.

Following the instructions on the Pocket Wizard site

  • I updated the firmware on all my Pocket Wizard transmitters and receivers.
  • Using the Pocket Wizard Utility software I set up the Pocket Wizard TT1 transmitter to Hypersync ONLY.
  • I set up the Pocket Wizard Flex TT5 transceiver to the Reduced Clipping mode and selected the AB1600 as the flash unit. This optimizes the trigger point to get the most power out of the unit at elevated shutter speeds

Since I have the Pocket Wizard AC3 zone controller to control the power settings of the Alien Bees, I also wanted to try the AC3 out it in this test. From the Pocket Wizard Wiki I was able to determine that the AB 1600 flash allows shutter speeds up to 1,000th second with very even illumination. At shutter speeds above 1/1,000th the clipping or banding starts to become noticeable on the full frame, but can be eliminated by cropping the image if needed.
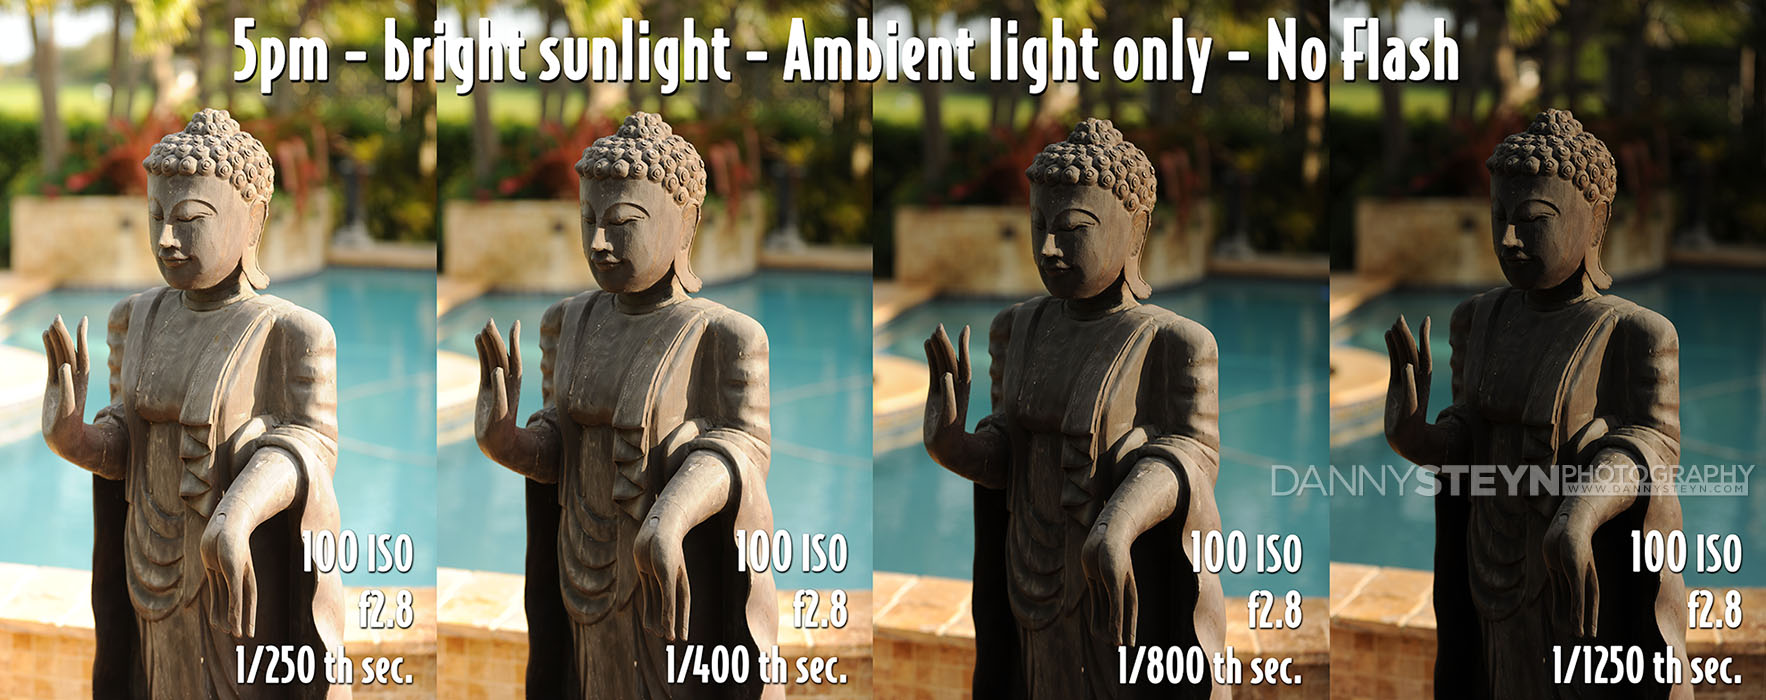
Ambient Light Test

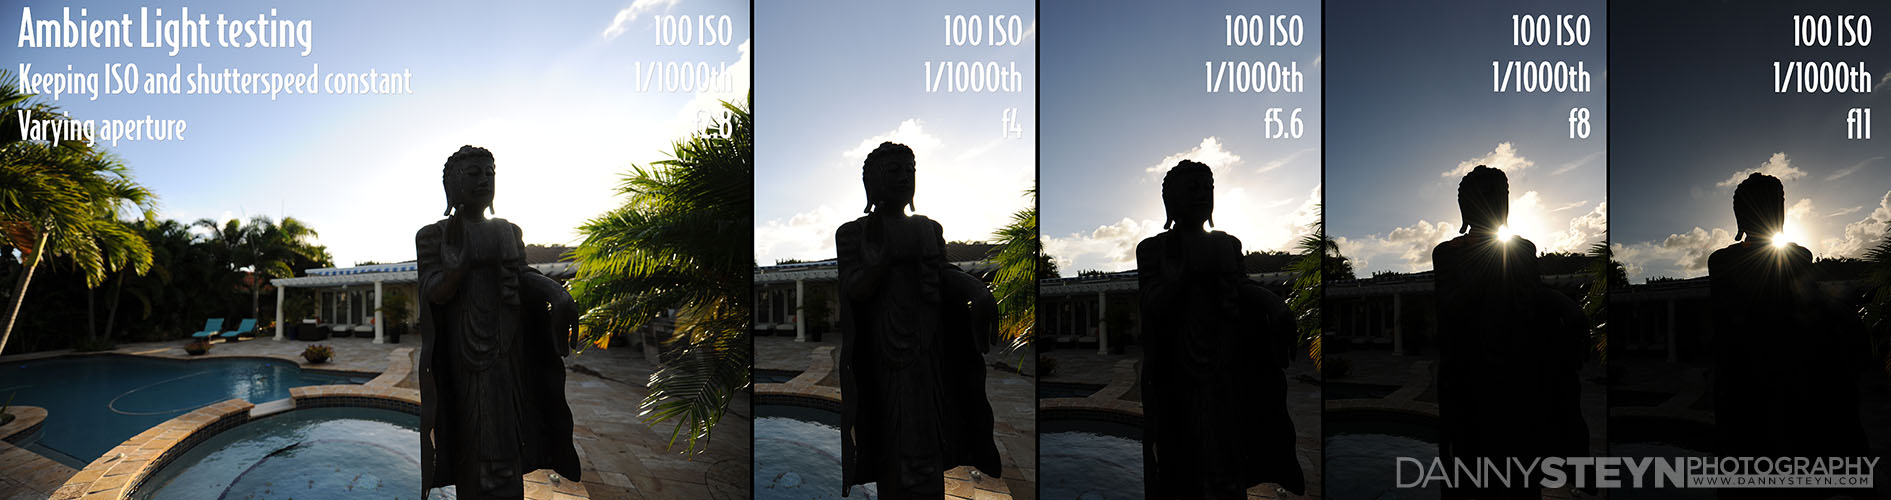
I conducted this test in the late afternoon shooting directly into the setting sun. As I already knew that 1/1,000th of a second was achievable, I kept the ISO constant at 100, the shutterspeed constant at 1/1,000th of second and adjusted the aperture to get the most pleasing background exposure

Ambient lighting test - 100 ISO, 1/1000th second, varying aperture Nikon D3x hypersnyc test with Alien Bees B1600 mono lights using Pocket Wizard Mini TT1, Flex TT5, AC3 Zone controller and MC9
Ambient lighting test – 100 ISO, 1/1,000th second, varying aperture
Nikon D3x hypersnyc test with Alien Bees B1600 mono lights using Pocket Wizard Mini TT1, Flex TT5, AC3 Zone controller and MC9

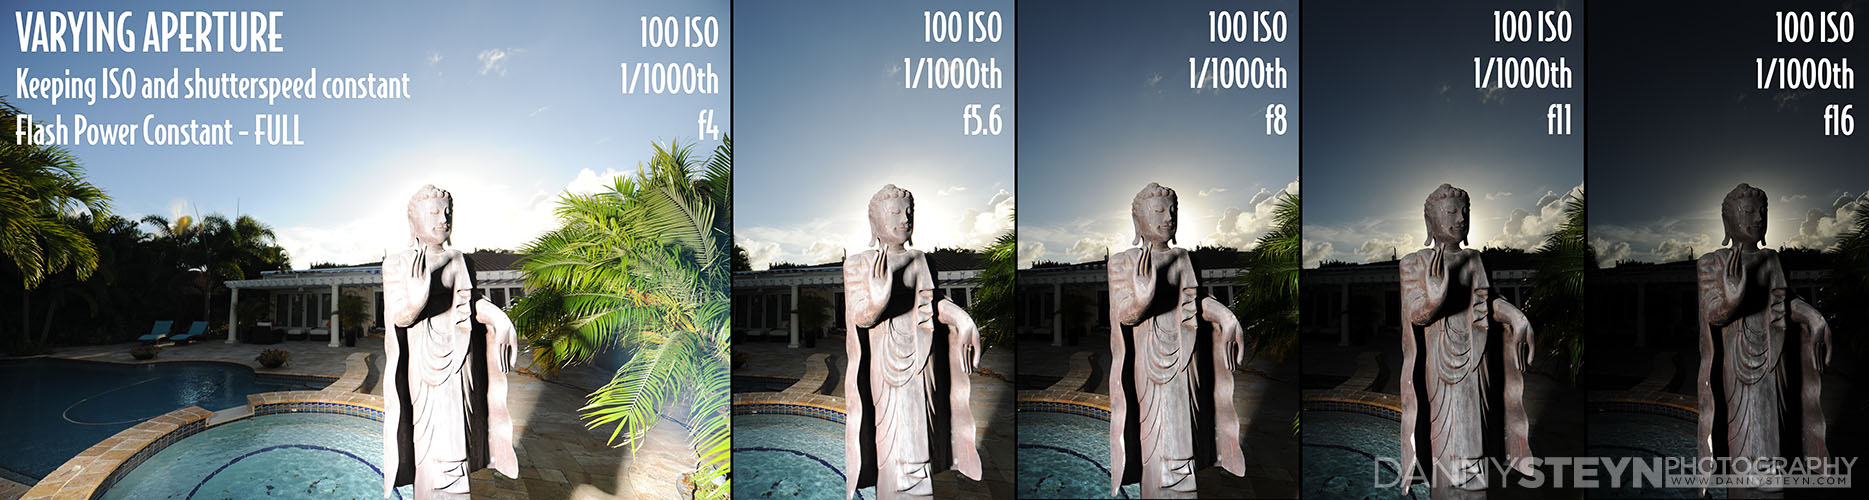
Playing with Aperture

Everything I had read indicated that you needed to fire the flashes at full power as this gave the longest flash duration and this would provide the best illumination with the elevated shutter speeds. So the first test was conducted with the following settings

  • ISO 100
  • Shutter Speed 1/1,000th
  • Flash Power FULL
  • Aperture – adjusted to suit

I was specifically looking to see if there would be any banding at the 1/1,000th shutterspeed and if so would it be more noticeable at smaller apertures. As you can see from the images below, there was no detectable banding at 1/1,000th second and while the aperture selection affected the overall exposure, the smaller aperture did not yield any banding at all.

As expected, reducing the aperture reduces both the ambient light and flash exposure.

FULL FLASH POWER constant ISO shutter speed - Varying Aperture Nikon D3x hypersnyc test with Alien Bees B1600 mono lights using Pocket Wizard Mini TT1, Flex TT5, AC3 Zone controller and MC9
FULL FLASH POWER constant ISO shutter speed – Varying Aperture
Nikon D3x hypersnyc test with Alien Bees B1600 mono lights using Pocket Wizard Mini TT1, Flex TT5, AC3 Zone controller and MC9

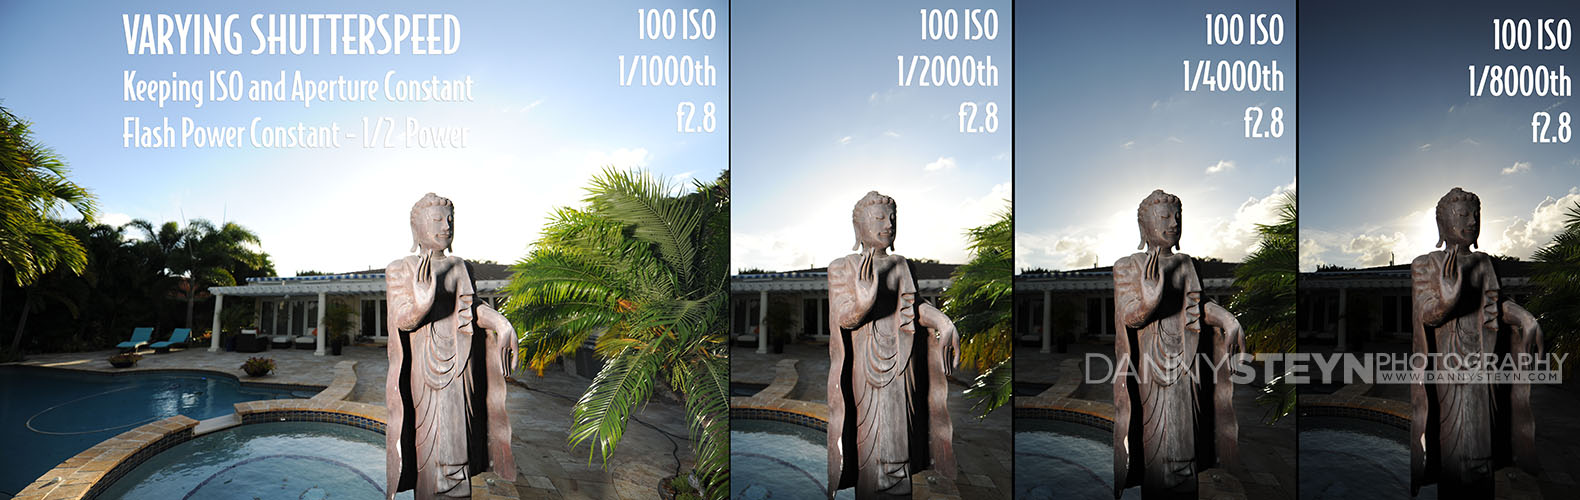
Playing with Shutter Speeds

I was so encouraged with the ability to immediately sync at 1/1,000th of a second without any banding (2 full stops faster than my Nikon D3x max flash sync speed of 1/250th ) that I decided to see for myself what the real limit would be with shutterspeed.

So this time I set my Nikon D3x camera and Alien Bees flash settings as follows

  • ISO 100
  • Aperture f2.8
  • Flash Power FULL
  • Varying Shutter Speed
  • I started at 1/1,000th second and went up in full stops from there.
FULL FLASH POWER constant ISO and Aperture Varying shutter speed Nikon D3x hypersnyc test with Alien Bees B1600 mono lights using Pocket Wizard Mini TT1, Flex TT5, AC3 Zone controller and MC9
FULL FLASH POWER constant ISO and Aperture Varying shutter speed
Nikon D3x hypersnyc test with Alien Bees B1600 mono lights using Pocket Wizard Mini TT1, Flex TT5, AC3 Zone controller and MC9

As you can see all the images are a bit overexposed at F2.8, full power and the flash to model distance I selected, but it did reveal the shutterspeed at which the banding becomes noticeable. There is absolutely no visible banding at the bottom of the image at 1/1,000th.

At 1/2,000th there is just a hint of imperceptible banding, but as we get to 1/4,000th and 1/8,000th it is very noticeable but in reality the banding only projects into the bottom edge of the landscape formatted images. A simple cropping of less than 10% of the image yields a very usable image will almost no detectable banding at 1/8,000th of an image. WOW.

Knowing which side of your frame will be banded and how far it will project into the image will allow me to compose the shot for cropping in such a way as to yield very acceptable shots a 1/8,000th of a second, a major breakthrough for my photography. This is very exciting.

Interesting to note. Now since we are dealing with a flash exposure that is inherently longer than the shutter speed, increasing shutter speed now not only reduces the ambient light exposure but also now reduces the flash exposure, something that must now be factored into the exposure calculations.

Playing with Flash Power and Shutter Speeds

Based on the very encouraging results I obtained at full power, I wanted to see if they would be dramatically different at lower power settings, so I immediately lowered the power to ½ power using the AC3 Zone Controller, and tried the same test, varying the shutter speeds.

So this time I set my Nikon D3x camera and the Alien Bees flash settings as follows

  • ISO 100
  • Aperture f2.8
  • Flash Power ½
  • Varying Shutter Speed
HALF FLASH POWER constant ISO and Aperture Varying shutter speed Nikon D3x hypersnyc test with Alien Bees B1600 mono lights using Pocket Wizard Mini TT1, Flex TT5, AC3 Zone controller and MC9
HALF FLASH POWER constant ISO and Aperture Varying shutter speed
Nikon D3x hypersnyc test with Alien Bees B1600 mono lights using Pocket Wizard Mini TT1, Flex TT5, AC3 Zone controller and MC9

As you can see all the banding results are almost identical to those achieved at the full power setting. There is absolutely no visible banding at the bottom of the image at 1/1,000th, but it does become noticeable as the shutter speed increases. However, once again, cropping 10% of the image yields a very usable image will almost no detectable banding at 1/8,000th of an image. WOW.

But even more important is that I now have options. The ability to reduce flash power and get great exposures at elevated shutterspeeds is HUGE. So instead of being forced to change the flash-to-model distance to get the right exposure, I now have the option of using the AC3 controller on top of the camera to reduce the flash power and this will further allow me to get more exposures from the battery.

1/2000th second at f2.8 with two Alien Bees B1600 heads at 1/2 POWER 100 ISO Nikon D3x hypersnyc test with Alien Bees B1600 mono lights using Pocket Wizard Mini TT1, Flex TT5, AC3 Zone controller and MC9
1/2000th second at f2.8 with two Alien Bees B1600 heads at 1/2 POWER 100 ISO
Nikon D3x hypersnyc test with Alien Bees B1600 mono lights using Pocket Wizard Mini TT1, Flex TT5, AC3 Zone controller and MC9

To be honest I am more than thrilled with the results so far. More testing is needed! But remember that shooting directly into the sun will reveal all the sensor dust bunnies that you never knew you had!

Click here to see my next test utilizing Nikon D3X and Alien Bees with Pocket Wizard Mini TT1 and Flex TT5

Hypersync with Nikon D3x and Nikon SB 800/SB 900 flash – TEST # 1

Hypersync with Nikon D3x and Nikon SB 800/SB 900 flash

Pocket Wizard’s hypersync function allows you to use flash at shutter speeds well over the standard maximum synch speed of your camera (in most cameras the max flash synch speed is around 1/250th of a second).

Why do you need flash synch at speeds over 1/250th second?

So why would you want to use flash at speeds higher than 1/250th? There are many reasons, ranging from freezing action in sports photography to my case where I shoot models outdoors and I run into the typical issues all photographers face……

If you shoot the model in direct sunlight and you want to use a wide aperture to create a narrow depth of field that blurs the background and makes the model pop out of the shot, then you have to use higher shutter speeds, even at low ISO values. My typical early morning sunrise beach shots require shutter speeds in the range of 1/1,000th  – 1/2,000th at my preferred shooting apertures ranging between F2.8 and F4.0 at 100 ISO. This means that you cannot use flash and you need to use reflectors to fill in the shadows.

Outdoor beach glamour photography - Using multiple reflectors to fill in shadows
Outdoor beach glamour photography – Using multiple reflectors to fill in shadows

And while approach this has worked incredibly well for me over the years there are several issues created with the reflector approach

  1. The model has to keep her eyes closed until the moment the trigger is tripped so she does not have to stare into the bright reflector reflecting the sunlight into her otherwise silhouetted face. Keeping the model’s forehead relaxed and her eyes fully open is always a struggle in these situations
  2. Often the wind direction is coming from the same direction as the sun, and to keep the model rimmed by the sun, you end up with her hair blowing around her face, making shooting in the that direction almost impossible.

So it would be really great to shoot at 1/2,000th of a second at f2.8 and use flash to fill in the shadows. This gets around both of the problems above as the model no longer has to deal with a bright light continuously in her face, and it also allows you to orientate the model in such a way that the wind is blowing her hair in an acceptable direction.

Hypersync vs. HSS (High Speed Sync)

There are at least two methods that allow you to use flash at higher than normal synch speeds

  1. HSS (High Speed Synch). This essentially makes the Nikon strobes fire in continuous low power pulses, and while it works very well in most situations, the power fall off from the flash firing thousands of consecutive low power flashes means that you cannot get normal illumination from your flash. So you have to gang several flash heads together and bring the flash units very close to the model. This often results in uneven illumination and also results in overheating the flash heads if you are shooting a lot of images in quick succession. I have used HSS shooting models at high shutter speeds but the inability to pull the flash heads further back from the model to create more evenly lit model has resulted in less than ideal results, and the overheating is a real issue.
  2. Hypersync. This technology is achieved using Pocket Wizard hardware and software to create a pre-trigger event to get most of the illumination from the flash head to synchronize with the higher than normal shutter speed. In my case I use the Nikon specific Pocket Wizard TT1 transmitters and the Pocket Wizard TT5 transceivers. Hypersync can be used with both Speedlights (Nikon, Canon flash heads etc.) and with studio lights, but note that both have to be set at FULL power (in most cases) meaning that you have no flash exposure control other than the distance of the flash to the model. In the case of studio lights, they offer way more power (WS) than speed lights, so can potentially offer substantially faster shutter speeds and allow you much greater flash to model distances and allow you to use modifiers like soft boxes that create more even illumination. However the down side to using studio lights outdoors on location is that they need a power supply (either generator or portable battery) and are heavy to drag around outdoors, and of course large light boxes are prone to blowing over in the wind so you need additional sand bags to secure the light stands. Note that in the case of studio flash units, a light with a LONGER flash duration works better in Hypersync than a flash with  a shorter flash duration as the tail of the flash is better able to synch with the elevated shutter speed


TEST:- Hypersync with Nikon D3x and Nikon SB 800/SB 900 flash

In this test I am purely going to see what results I can achieve with my Nikon D3x and my Nikon SB800 and SB 900 strobes in hypersync mode. I have 6 of these but will only use 4 in this test. I wanted to do the test with the default PW settings (not adjusting any timing offsets in the software application) to see if it would work and then only make adjustments if the results were unacceptable.

I wanted to do the test at midday to deal with the harshest conditions but rain kept me inside and the test was conducted late in the afternoon. I shot at 100 ISO and F.8 with a 70-200mm lens.

First determine ambient light exposure

I first checked ambient light with no flash to determine what I considered the ideal exposure to give me the underexposed saturated background that I wanted

Ambient Light Exposure for Hypersync with Nikon D3x with SB900 and SB800 speedlights

While I actually liked the look of the background exposure at 1/800th, I settled on 1/1250th of a second to see if I could get the flash to synch at shutter speeds that I would typically deal with in my normal early morning beach shoot scenarios.

Pocket Wizard Nikon SB900 / SB800 speed lights in Hypersync

Equipment Setup - Hypersync testing with Nikon D3x with SB900 and SB800 speedlights - 1/1250th second at F2.8 100 ISO
Equipment Setup – Hypersync testing with Nikon D3x with SB900 and SB800 speedlights – 1/1250th second at F2.8 100 ISO

I positioned the flash units as follows. Note that I ganged two SB 900’s as my main lights as the distance to the “model” was too close to get even illumination over the full length of the model with just one bare flash head, so I added a second head lower down on the light stand to illuminate her “legs”.

The right hand side of her face was bathed in direct afternoon light. Below you will see a couple of examples. All images were shot in landscape format. None of the images below have been edited other than the text placed over the images. They are just as they came out of the camera, no adjustment of levels, color, contrast, saturation etc. They are also shown full height so we can see if any banding occurs (bottom of frame in landscape format on Nikon cameras)

I am happy to say that I was able to get very usable results with the 4 Nikon flash heads at speeds all the way up to 1/8000th of a second at F2.8 and at F4.0. The minute I tried stopping down the aperture to F5.6 or smaller, the flash units were not able to illuminate the model adequately, so this is where the studio lights would start to come into play. I achieved these results with the default PW settings, no adjustments were made to the flash offset timing.

It is important to note that when using hypersync, in these elevated shutter speeds, the flash duration is now inherently longer than the shutter speed, so now not only does the aperture control the flash exposure, but so too does the shutter speed. This is completely different to shooting with flash at shutter speeds under the sync speed where shutter speed has not effect on the flash exposure.

This means that if you want to shoot at really high shutter speeds around 1/4000th or faster, you will have to gang several speedlights together to compensate for the reduction in illumination.

Hypersync testing with Nikon D3x with SB900 and SB800 speedlights - 1/1250th second at F2.8 100 ISO
Hypersync testing with Nikon D3x with SB900 and SB800 speedlights – 1/1250th second at F2.8 100 ISO
Hypersync testing with Nikon D3x with SB900 and SB800 speedlights - 1/1250th second at F2.8 100 ISO
Hypersync testing with Nikon D3x with SB900 and SB800 speedlights – 1/1250th second at F2.8 100 ISO
Hypersync testing with Nikon D3x with SB900 and SB800 speedlights - 1/2000th second at F2.8 100 ISO
Hypersync testing with Nikon D3x with SB900 and SB800 speedlights – 1/2000th second at F2.8 100 ISO

Nikon Hypersync Summary

In summary the PW TT1 and TT5 units allow you to use Hypersync with Nikon (and other brands of speedlights) at much higher than standard shutter speeds. This allows you to

  • freeze action in sports photography,
  • use wide open apertures in bright sunlight,
  • to overpower the sun (to a limited effect with speed lights)
  • to underexpose the ambient light background to create deeply saturated images.

And I encourage you to do your own testing. Do not rely on my information as all cameras and flash units behave differently in Hypersync.

Click here to see the next HYPERSYNC test

New Photo Studio – electrical, plumbing, and interior painting

The electrician has rerouted all the conduit and is hanging the lights. The Plumber has installed the sinks and toilets in the bathrooms and the carpenter is installing the kitchen cabinets.

Baseboards painted and drying
Photo Studio Gallery showing marble floor, black 8ft doors with frosted glass, and black baseboards.
Updated small bathroom (non ADA) - new tiles and fixtures
Updated small bathroom (non ADA) – new tiles and fixtures
Photo Studio front Lobby showing tiles, black 8ft doors with frosted glass, and black baseboards. Lighting and drop ceiling being hung.
Editing room - new photography studio - black baseboards and glass brick wall
Editing room – new photography studio – black baseboards and glass brick wall
Kitchen cabinets being installed, room for the sink.
Kitchen cabinets being installed, room for the sink and the two ADA drinking fountains
Kitchen cabinets being installed, room for the sink and the two ADA drinking fountains (WTF?)

With regard to the kitchen, in case you are wondering why we have TWO DRINKING FOUNTAINS, the new ADA rules specify that you have to have two drinking fountains with 6″ of difference in height. R U KIDDING ME!!!! When is this madness ever going to end

The drywall crew are prepping some of the areas that we have marked, and then we should start with the final interior painting sometime next week.

The daylight studio has a coat of bonding epoxy down to increase the adherence of the filler layer and epoxy paints that will be used to paint the studio floor.

Still have to find some light weight room darkening blinds for the natural light studio as it will be used for both natural and studio light duties

Painting the new Photography Studio exterior

New photography studio - prior to purchase
South Entrance and parking – New photography studio – prior to purchase

Prior to selling the studio the previous owner had a done a great job of painting the studio, but s you can see in the image above, the  green colors they had chosen did not fit our color palette, and more importantly they blended in too much into the background.

With over 50,000 cars a day passing by we wanted a color scheme that would attract attention, be in line with our corporate color palette, and not be too un-Florida!

So we chose the color palette similar to our current web design – a darker coffee color at the called black raisin, a medium taupe waistline below and a light taupe for the majority of the walls. The back-lit store front signs that are being designed are in white and with the dark background they will easily be visible in both daytime and nighttime.

Painting the new Danny Steyn Photography Studio
South Entrance with the new paint colors - new Danny Steyn Photography Studio
South Entrance with the new paint colors – new Danny Steyn Photography Studio

While we like the dark black raisin as the top color for the building, we inverted the colors for the wall as we did not want to white bird droppings to show up on the boundary wall where they often congregate, so here the dark raisin color is used as the waistline to separate the two shades of taupe

Boundary wall - new Danny Steyn Photography Studio
Boundary wall – new Danny Steyn Photography Studio

Build Out Phase (Part 3) – New Photography Studio design project from start to finish

Drywall is complete

We are 6 weeks into the project, and allowing for the break between Christmas and New Year, things are going pretty smoothly. The GC is keeping the project moving along, but to date we have drifted about 2 weeks behind our original schedule. Not a train smash but still a bit disappointing.

All the interior drywalls are all complete. Both Studios as well as the Prop Room and the Gallery will have open ceilings, and these areas all received their dose of matte black paint. There will be some touch up required with the new AC vents that are still being installed.

Photography studio Editing Office dry-wall complete
Photography studio Prop Room dry-wall complete
Photography studio Lobby dry-wall complete.

Floor tiling has commenced

The floor guys have started laying tile in the Lobby, Office and Gallery areas. We had to make a small design change in the Lobby due to the layout of the doors. Unfortunately this means more of one tile and less of another so the lobby will only be completed on Saturday. We had so many compliments on the lobby of our old studio that we have stayed with the same floor design; a dark marble border around a light marble fill. Doors will be black with frosted glass panels.

New Photography Studio construction - Entrance Lobby tiling underway
New Photography Studio construction – Entrance Lobby tiling underway
New Photography Studio construction - Entrance Lobby tiling underway
New Photography Studio construction – Entrance Lobby tiling underway
New Photography Studio construction - Editing Office tiling underway
New Photography Studio construction – Editing Office tiling underway

We chose a busier and slightly darker tile for the Editing Room as the light cream tiles in our previous studio editing room showed the dirt too easily.

New Photography Studio construction - Studio walls and window frames being painted
New Photography Studio construction – Studio walls and window frames being painted

Interior oors are being custom made on site

Due to long lead times we were unable to purchase finished doors so we are having the GC custom make the doors on site. The finish carpenter is doing a great job with the 8ft tall wood doors that we purchased. He has cut out the recesses and is painstakingly installing the frosted glass panels

New Photography Studio construction - 8ft tall doors being custom made on site
New Photography Studio construction – 8ft tall doors being custom made on site
New Photography Studio construction - 8ft tall doors being custom made on site
New Photography Studio construction – 8ft tall doors being custom made on site


Build Out Phase (Part 2) – New Photography Studio design project from start to finish

With the structural inspections complete the drywall crew continued their task and now the tape and mud is being applied. Open ceilings in the two studios, gallery and prop room mean 12ft tall walls have to be dry-walled and smoothed. Looking forward to seeing the crew’s tall stilts on the high walls! There will be a drop ceiling in the lobby, editing office, bathrooms and kitchen/makeup areas.

Danny Steyn Photography Studio - Drywall framing, taping and mudding
Danny Steyn Photography Studio – Drywall framing, taping and mudding
Danny Steyn Photography Studio - Drywall framing, taping and mudding - editing office
Danny Steyn Photography Studio – Drywall framing, taping and mudding – editing office


Danny Steyn Photography Studio - Drywall framing, taping and mudding - Main Lobby
Danny Steyn Photography Studio – Drywall framing, taping and mudding – Main Lobby

We decided to remove some of the overgrown vegetation to reveal the front of the building so that the signage will be visible to the 50,000+ vehicles a day that pass the studio. We are playing with signage design, paint colors as well as exterior landscaping. Kind of cool to see the exterior moving along as well.

Danny Steyn Photography Studio - Exterior - North Entrance
Danny Steyn Photography Studio – Exterior – North Entrance
Danny Steyn Photography Studio - Exterior - North Entrance
Danny Steyn Photography Studio – Exterior – North Entrance
Danny Steyn Photography Studio - Exterior - North Entrance
Danny Steyn Photography Studio – Exterior – North Entrance – And vehicle entrance to main studio